Social Media Marketing 28 min read
10 Nov 2021

The Complete Guide to Facebook Advertising for Your Ecommerce Store

The Complete Guide to Facebook Advertising for Your Ecommerce Store

Dear Entrepreneur,

If you want to generate high-quality traffic to your store and experience the massive scaling potential of running Facebook Ads...

This crash course will be the most important thing you’ll read today.

Here’s why:

You already know how huge Facebook is when it comes to social media.

And despite what other marketers say about new “hot” platforms you must market right now...

Facebook is still the undisputed King Kong of social media.

It has the largest network in the world with over 3 billion active users

… and 1.6 billion daily users.

That’s a lot of potential eyeballs visiting your store, right?

But that’s not even the best part.

You see, Facebook is an absolute master of one thing…

Collecting TONS of Data!

Now you’re probably thinking about what “data” has to do with getting more customers to your store.

It’s just a bunch of statistics and numbers, right?

Well, it is!

But to marketers like us, data is worth its weight in gold.

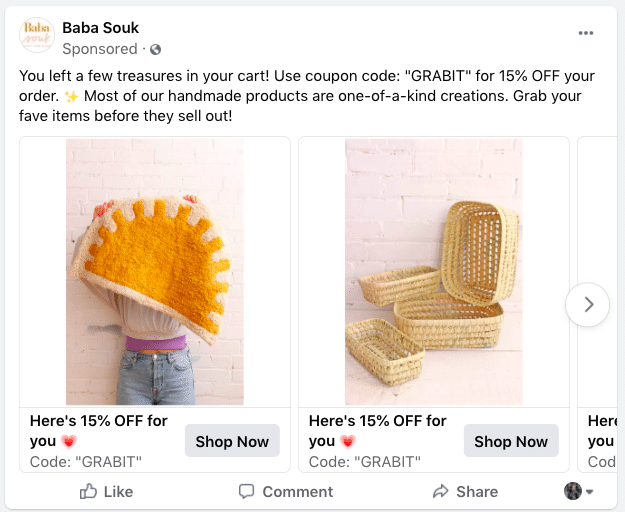
It’s the reason we’re seeing Sponsored Ads from almost every product we’re looking for.

It’s like an “invisible sales agent” was following us all day…

Observing what we say and do… 

And right at the perfect moment, this sales agent…

Shows Us What We Want

And Offers Ways To Get It!

Now that may sound creepy to most people.

It’s as if someone is watching every move you make.

But to a marketer like me, it’s the perfect setup for massive sales.

Because with Facebook’s Algorithm… we won’t have to experience marketing dog supplies to cat lovers anymore.

We can choose to laser-target people who actually care about and would have the highest chances of actually buying our offers!

That is the power of Facebook Advertising.

And in the next few minutes, I’ll show you exactly how to harness the full potential of this “holy grail” of advertising…

And how to set up your very first successful ad campaign even if you haven’t got a single clue where or how to start.

So keep yer hands and feet inside the vehicle, ladies, and gents… 

The ride is about to start.
 

Quick “Laundry List” of Why You Need to Advertise on Facebook


✔️Everyone is on Facebook.

✔️You can focus on ideal buyers.

✔️Helps build brand awareness.

✔️You can set reasonable budgets.

✔️Reach people through retargeting.

✔️Discover new leads.

✔️Simple to set up.

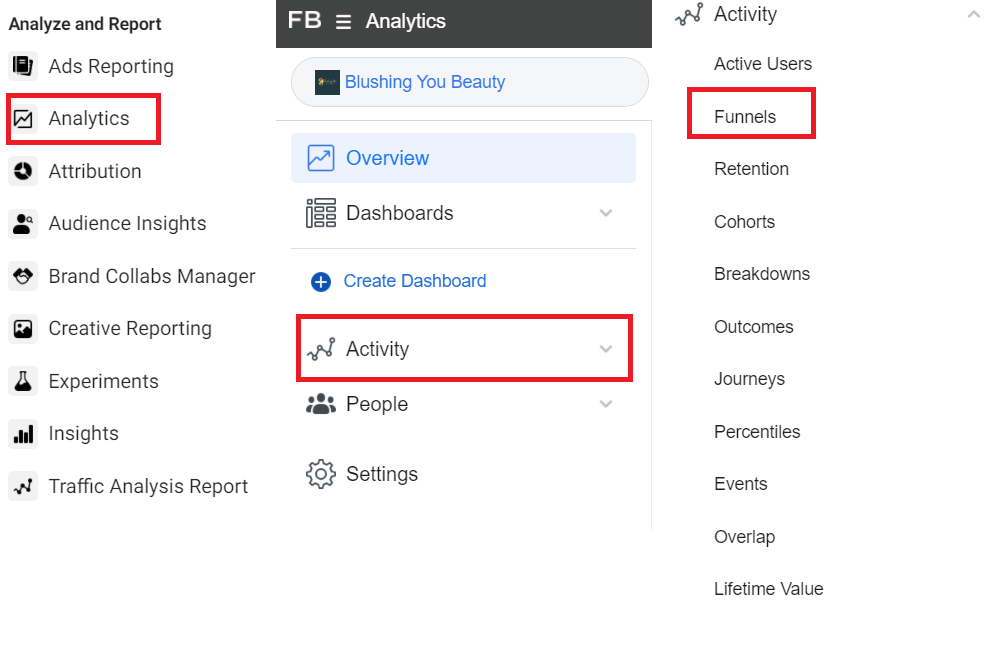
✔️Offers measures of success: Facebook Analytics.

✔️You can add Call-to-Action buttons.

✔️Facebook allows video ads.

✔️Facebook’s Reach is expanding rapidly.

With that being said, let's get to the good stuff.

How to Advertise on Facebook?


Now that you know how Facebook marketing benefits your business.

I'm sure you're ready to start your campaign.

In this part of the Facebook marketing guide, you'll discover how to:

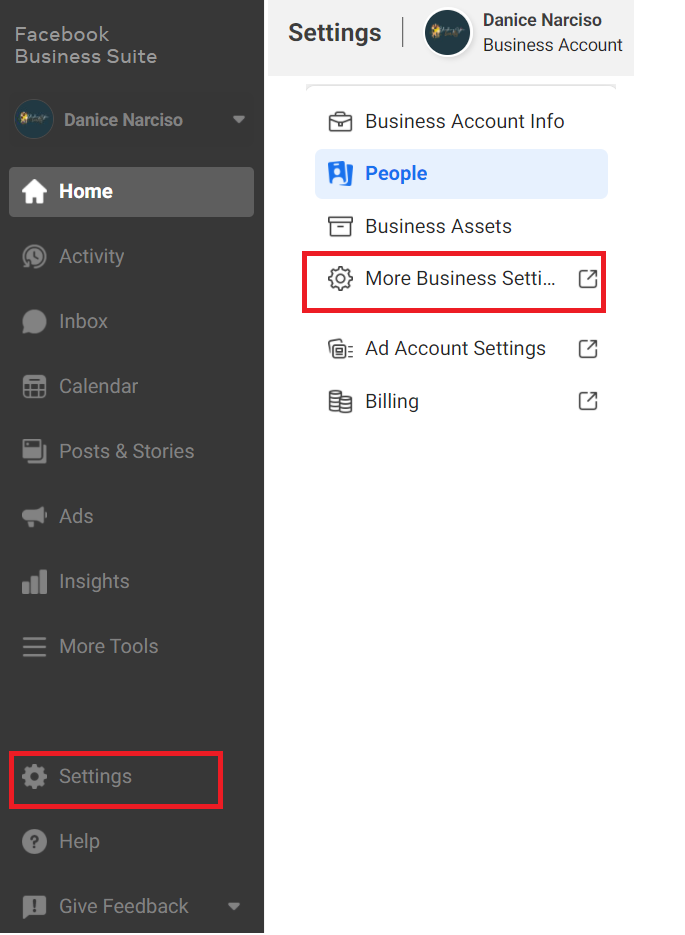
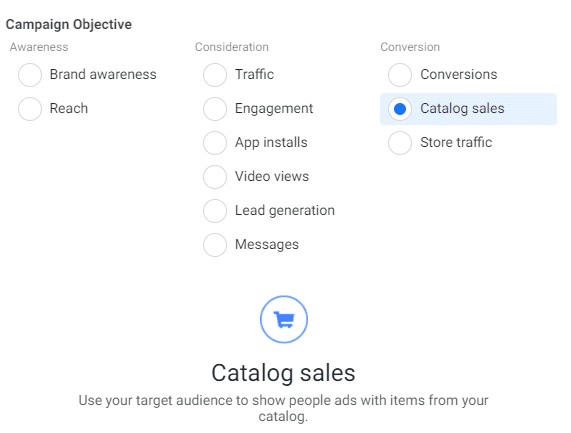
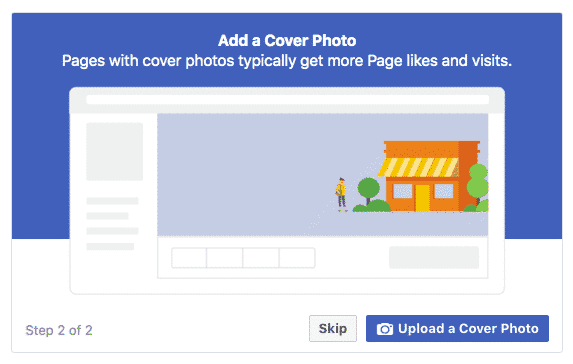
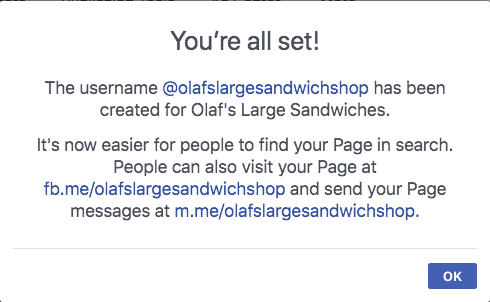
✔️Set up your Facebook business account.

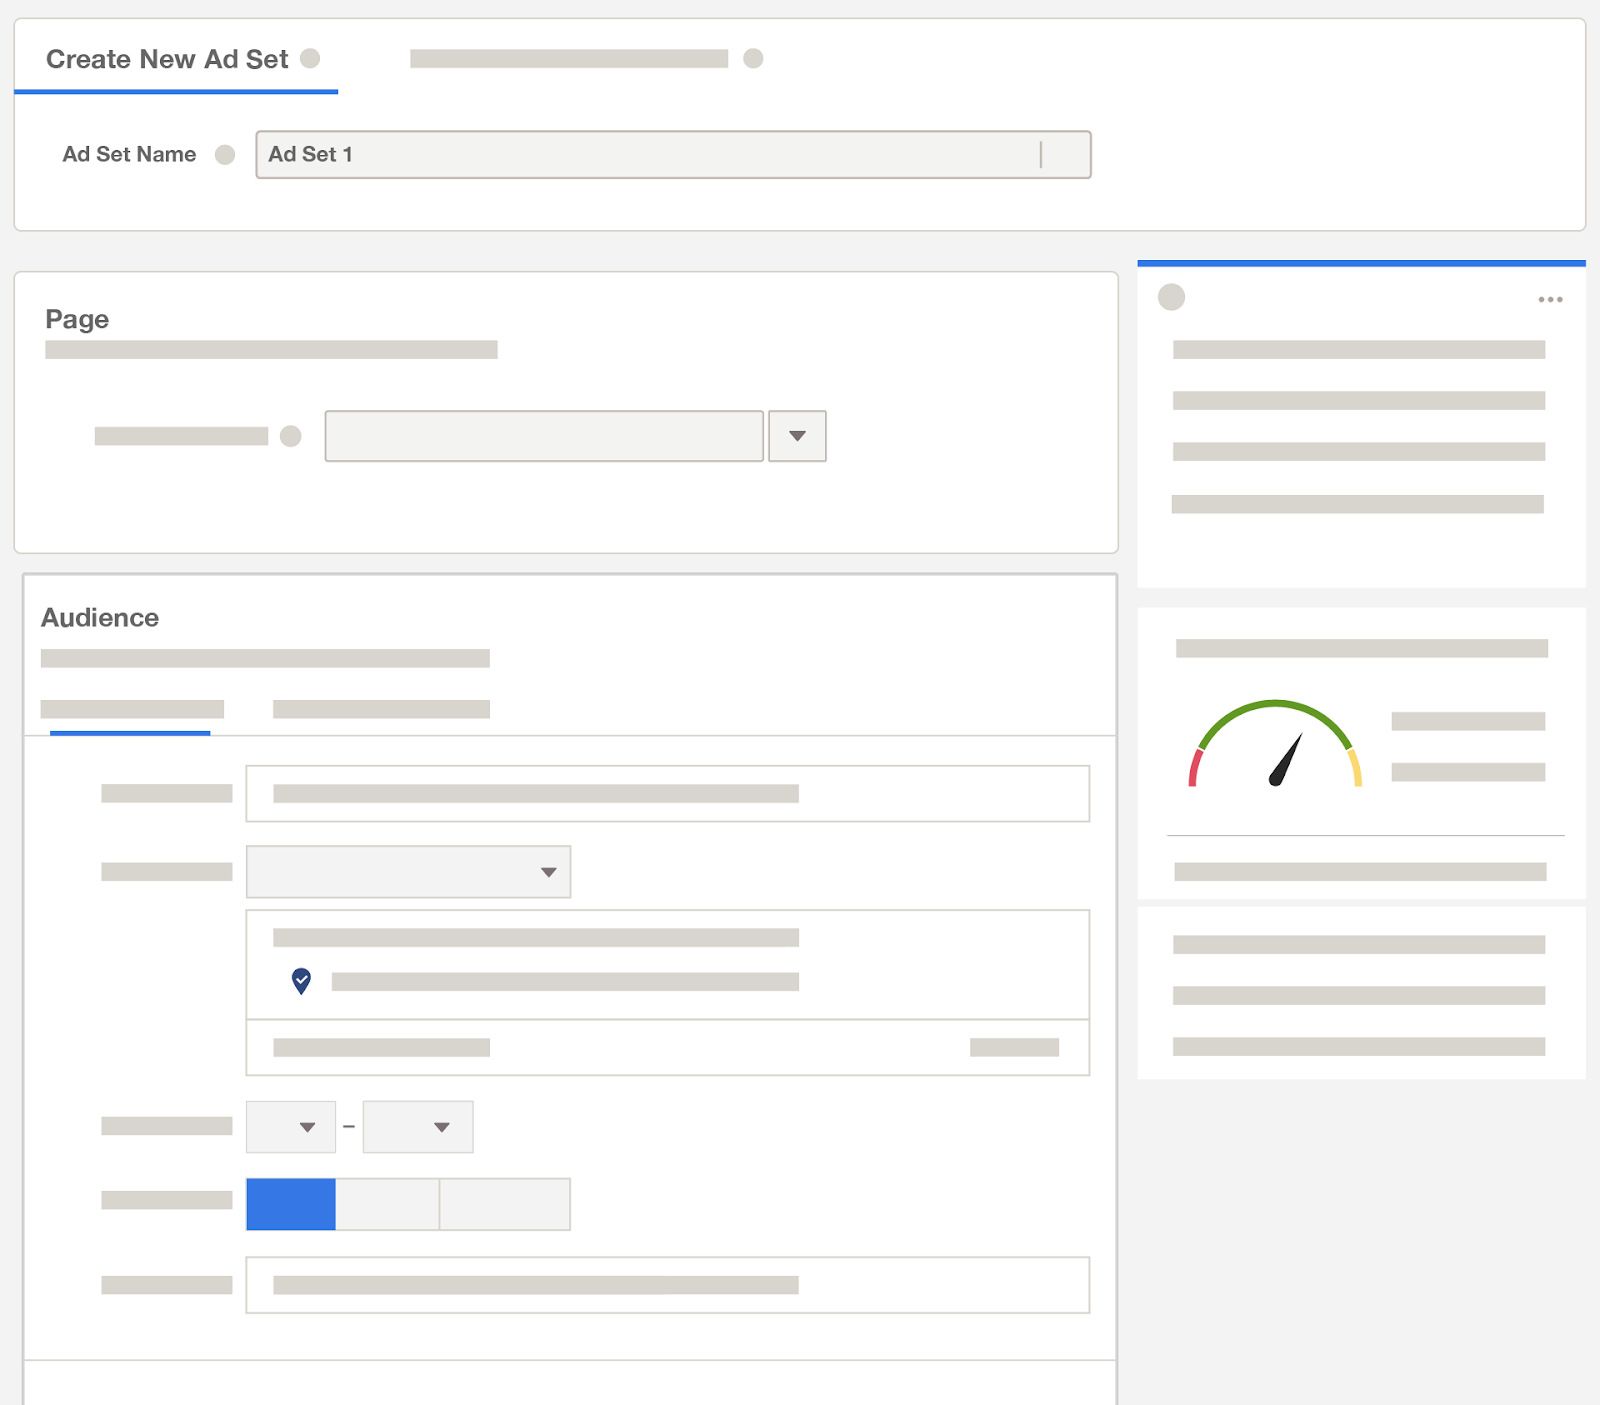
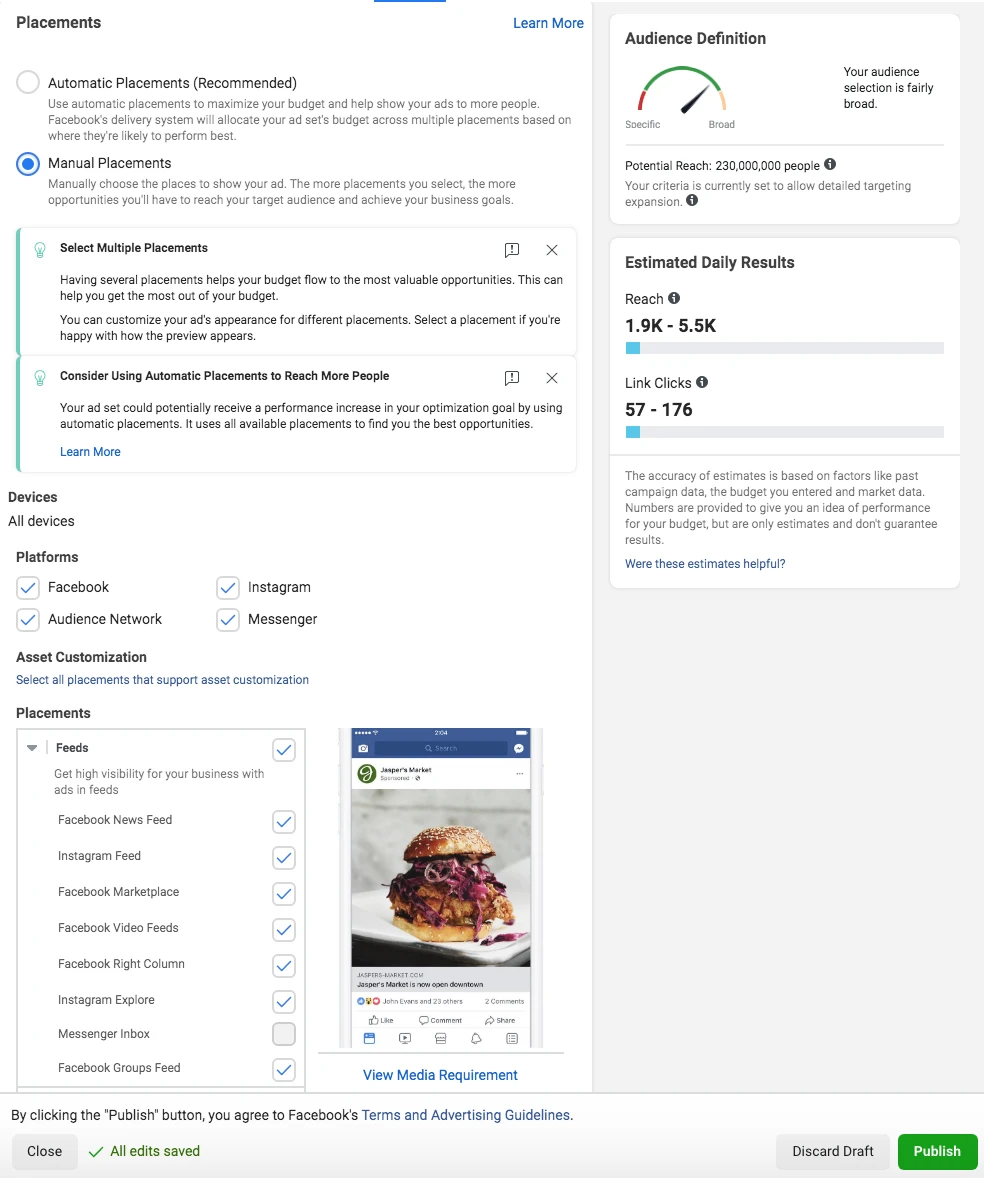
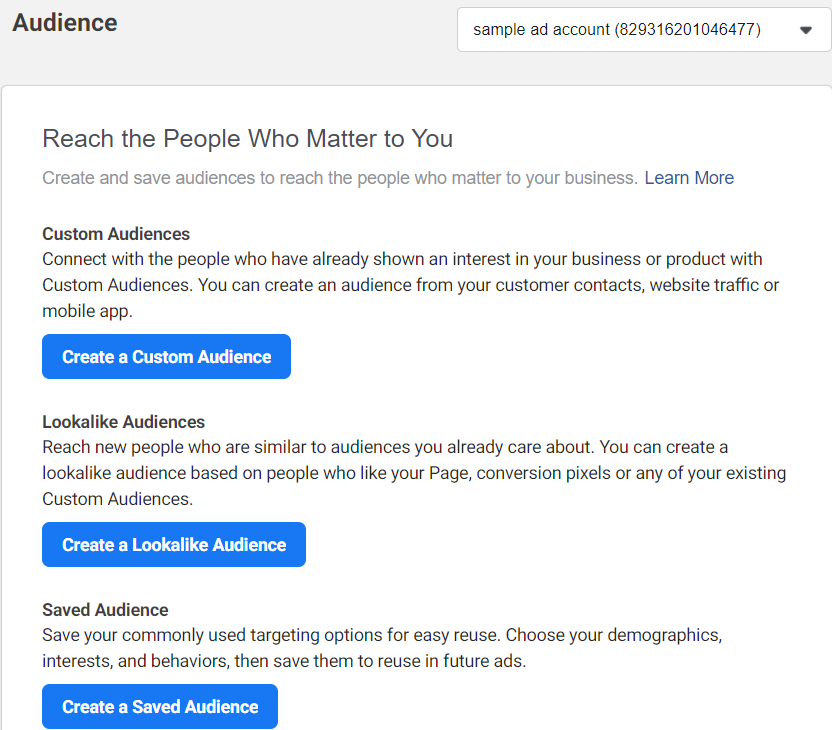
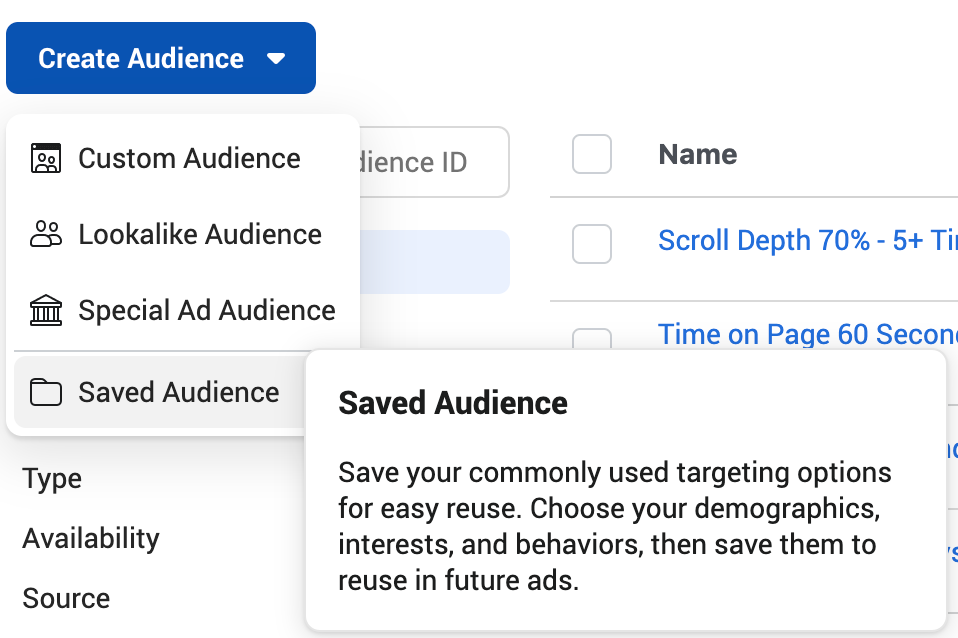
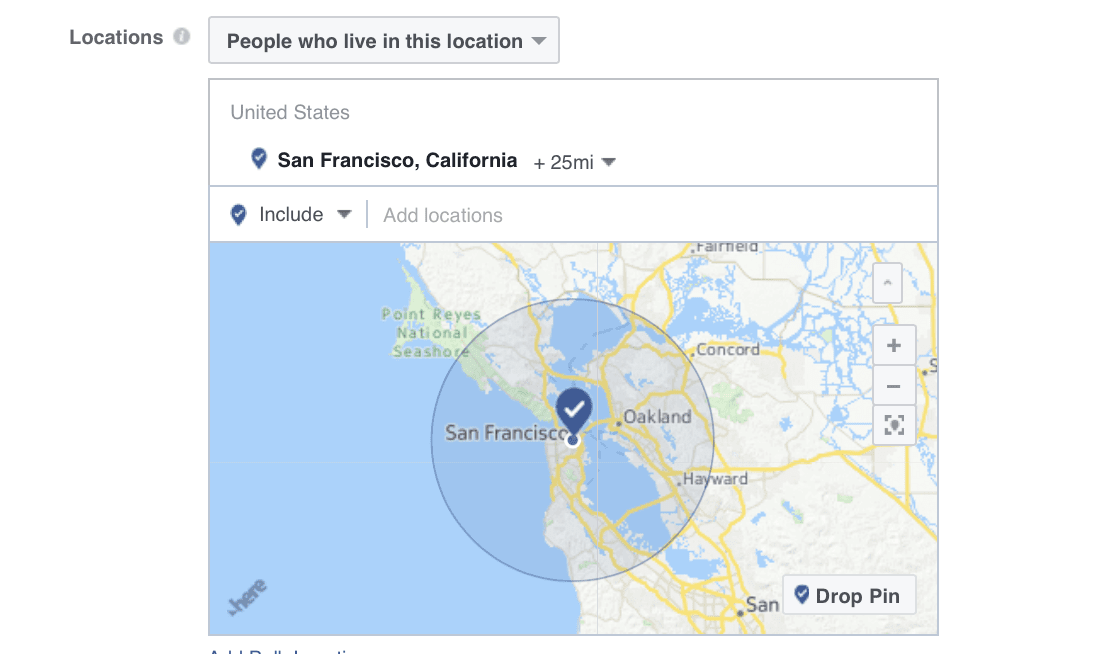
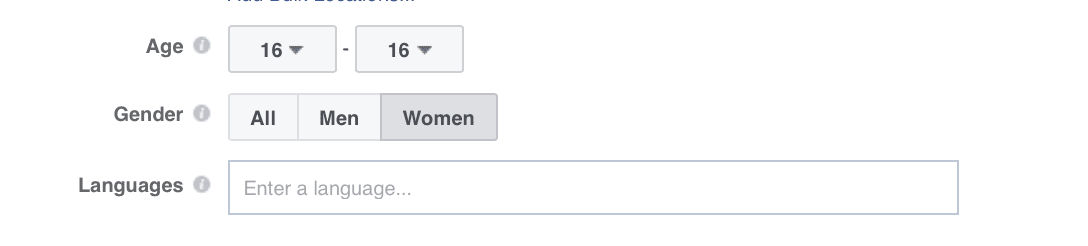
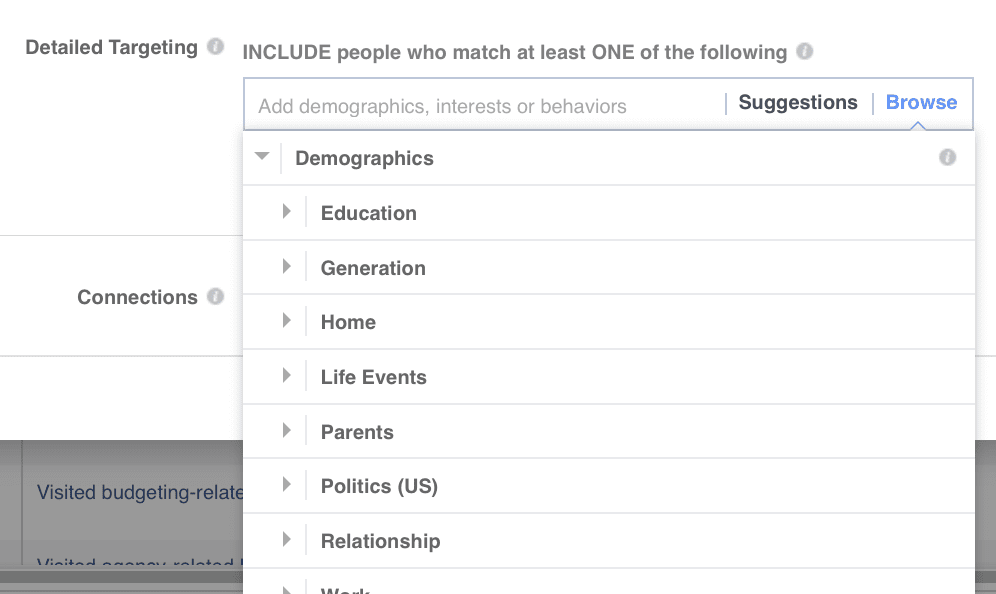
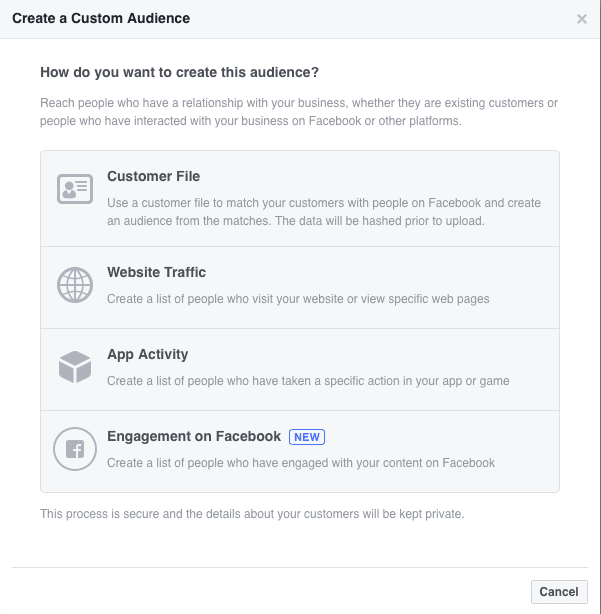
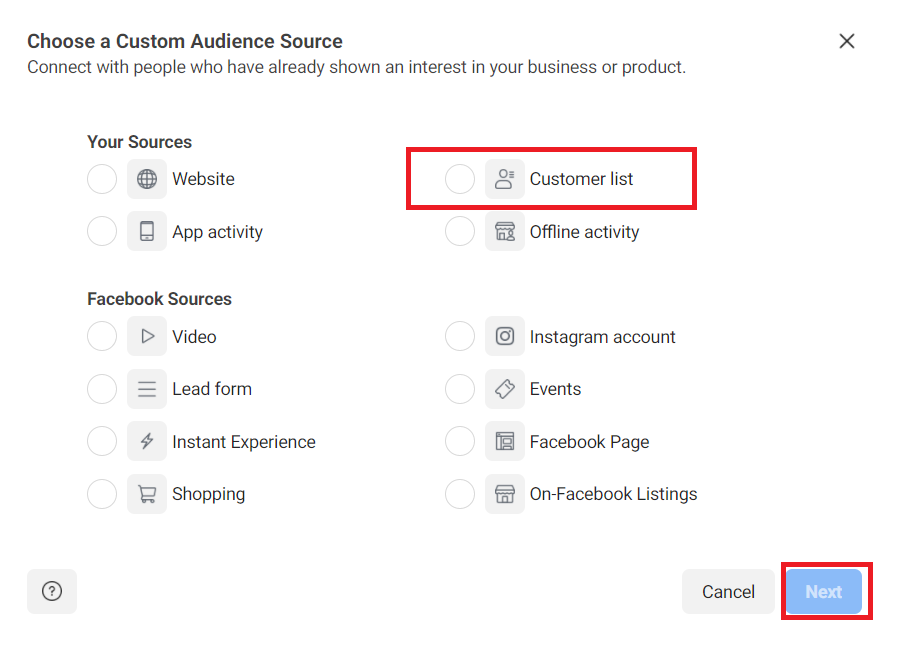
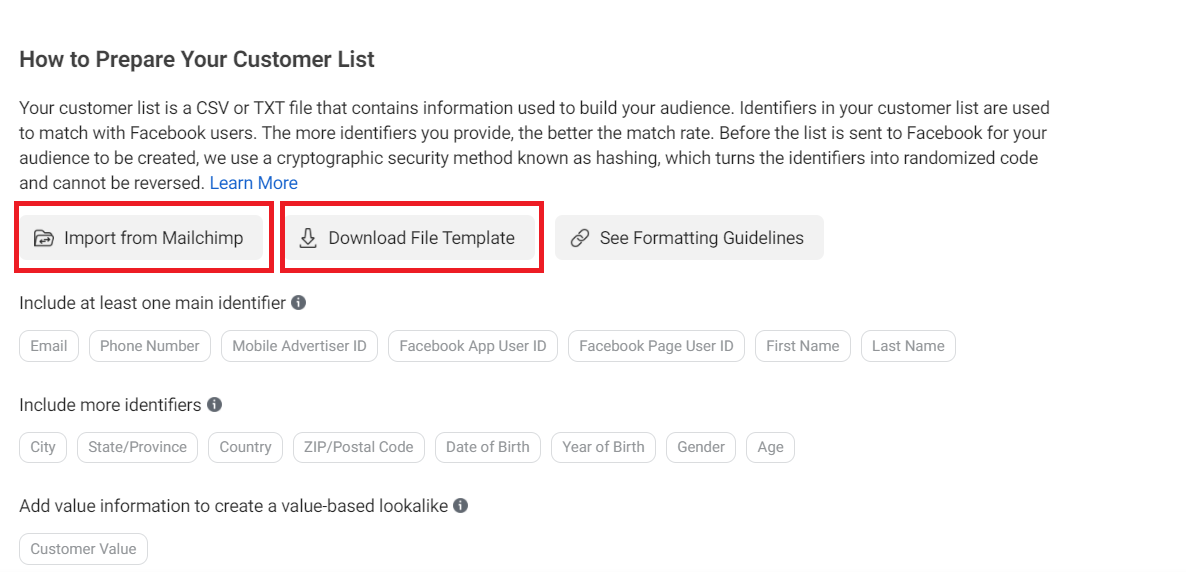
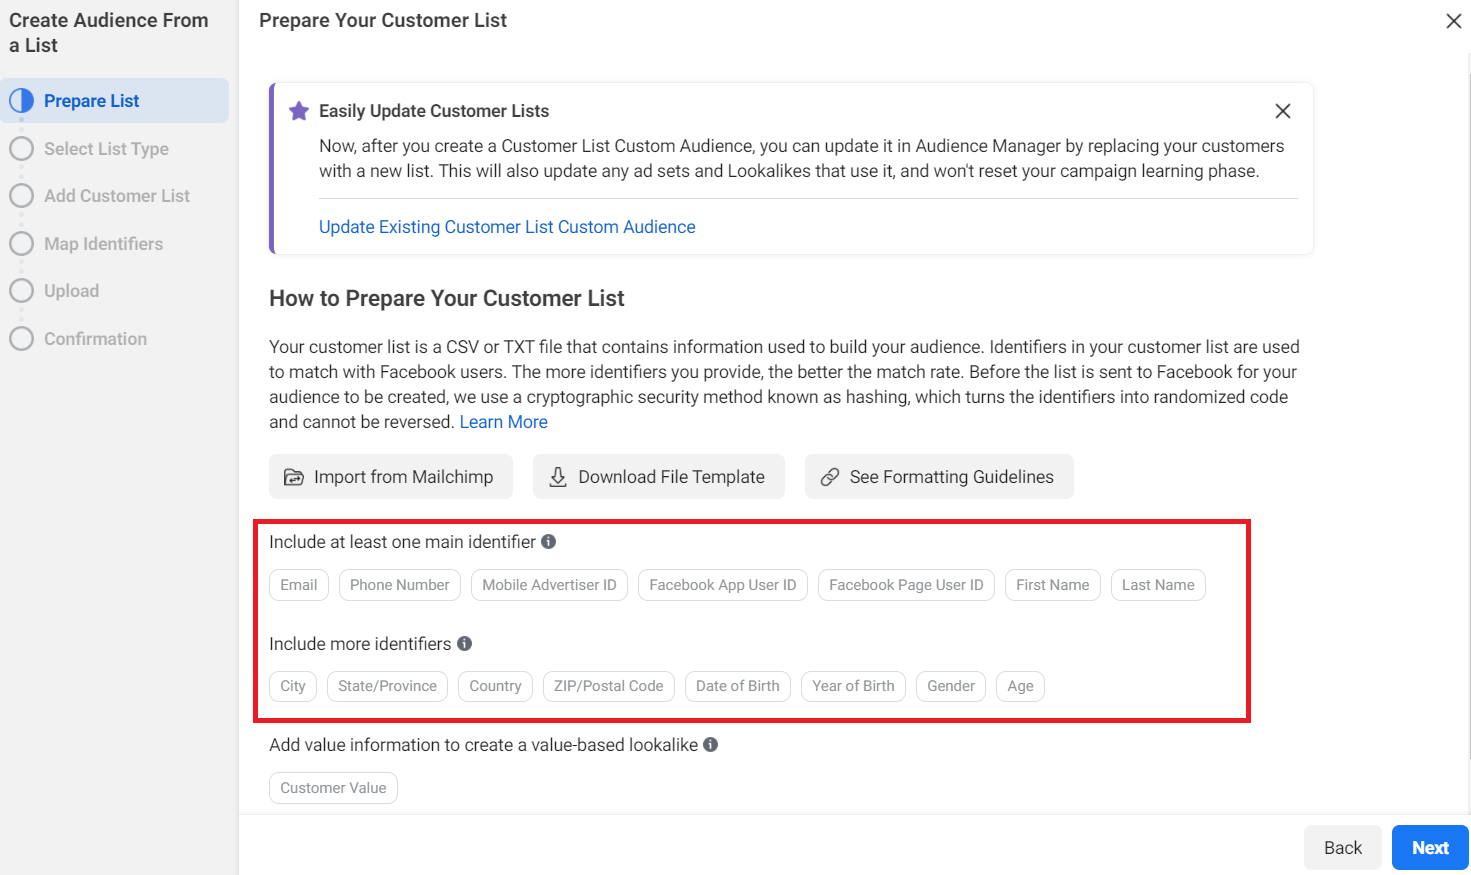
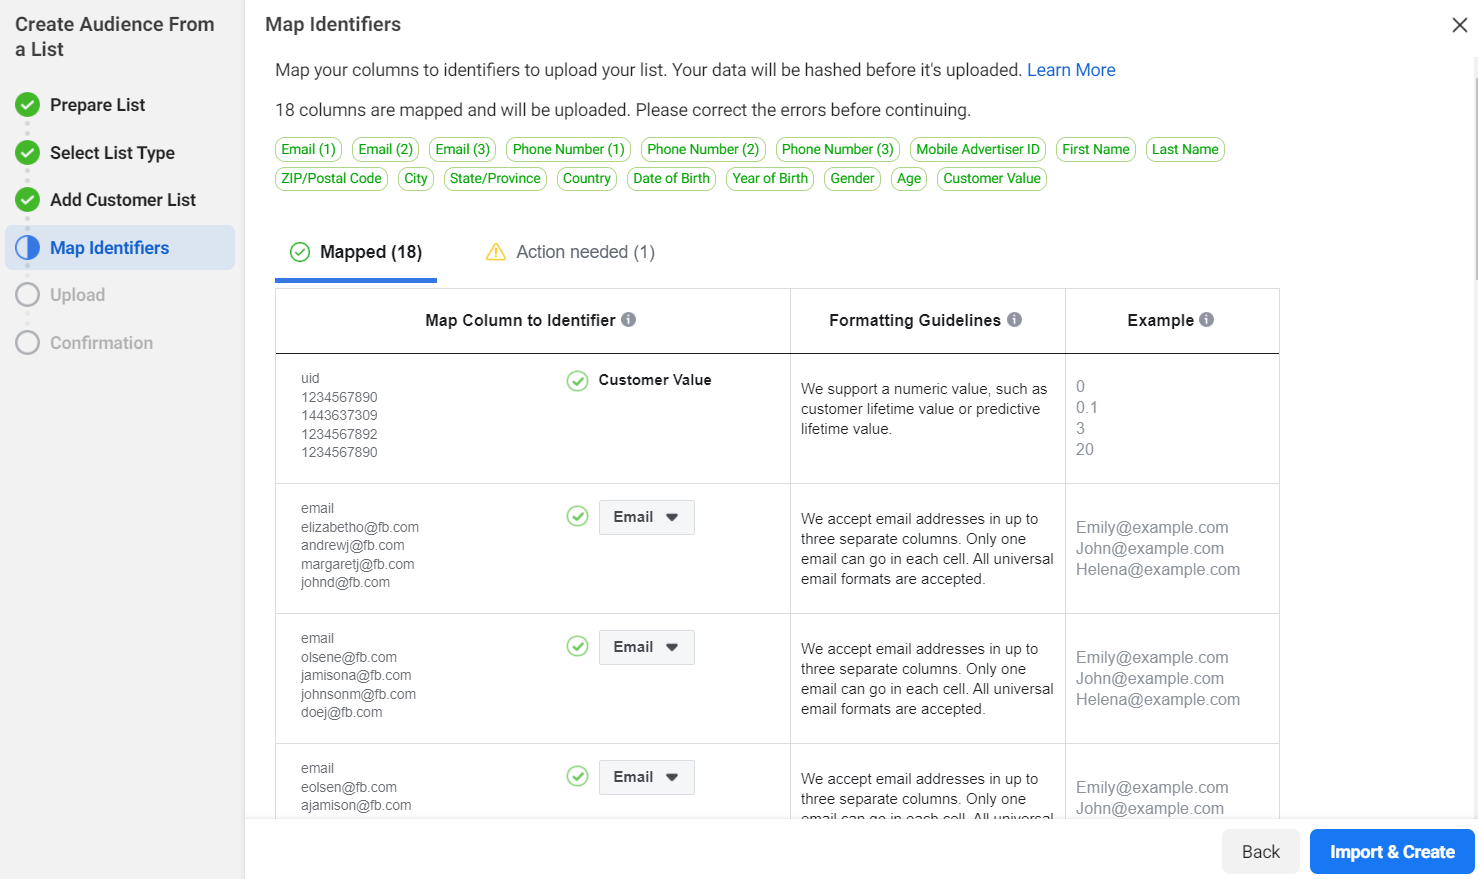
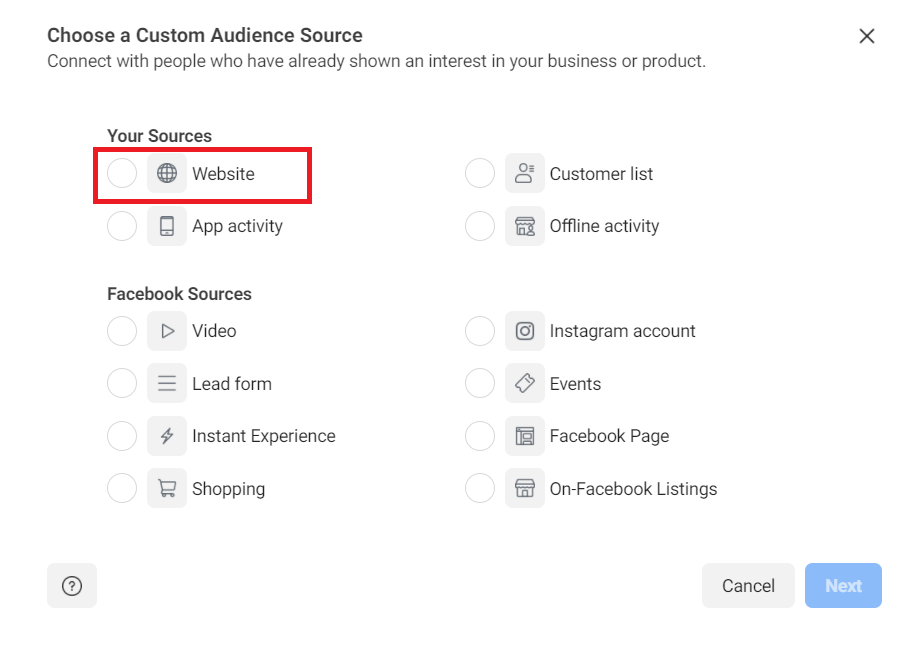
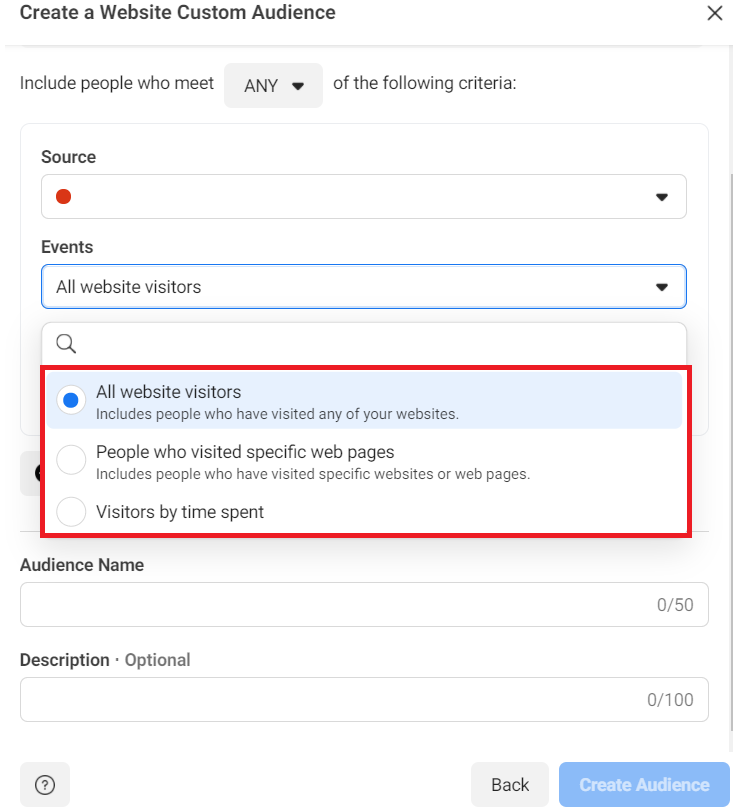
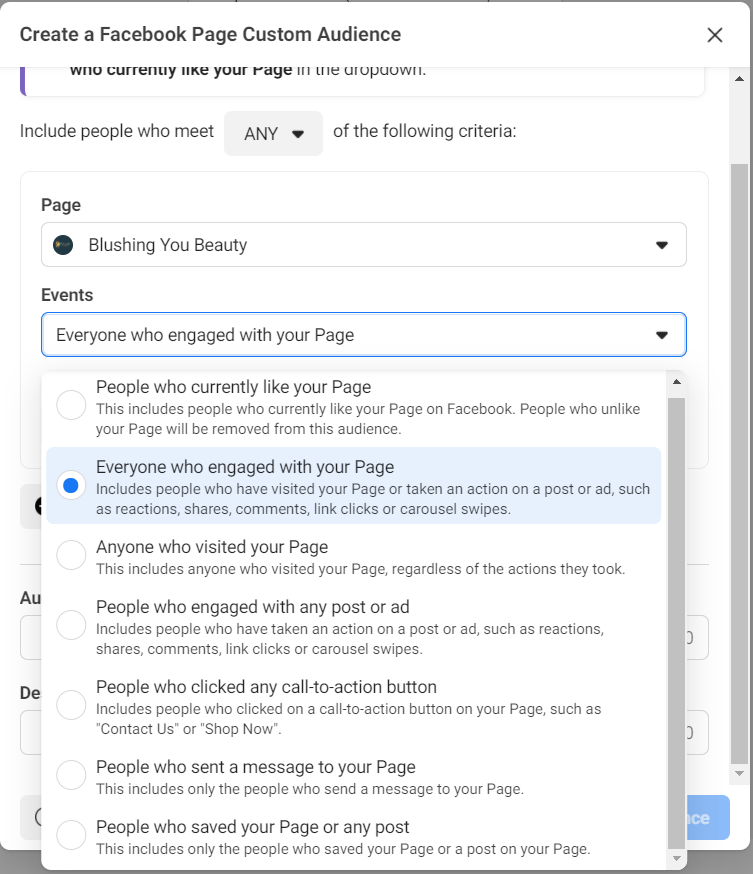
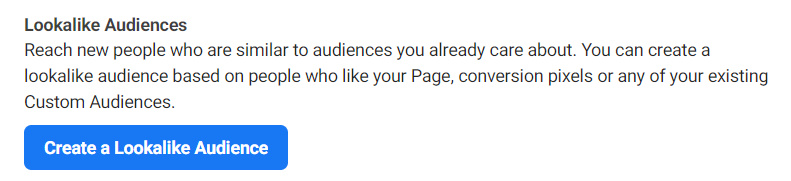
✔️Choose your audience based on behavior, demographics, interests, or lookalike audiences.

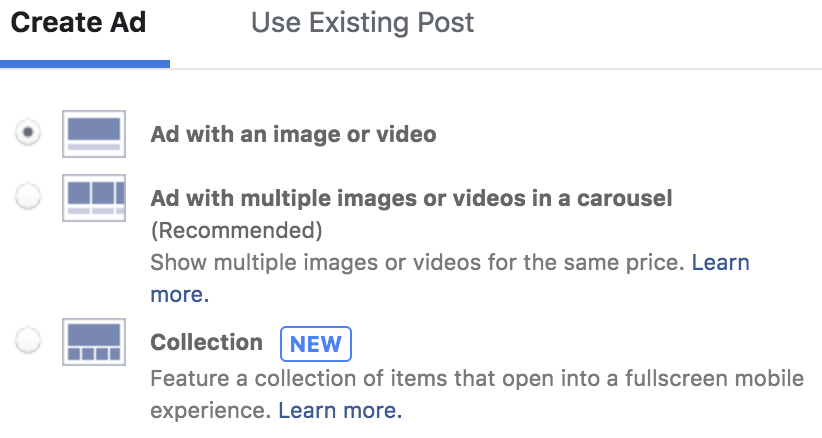
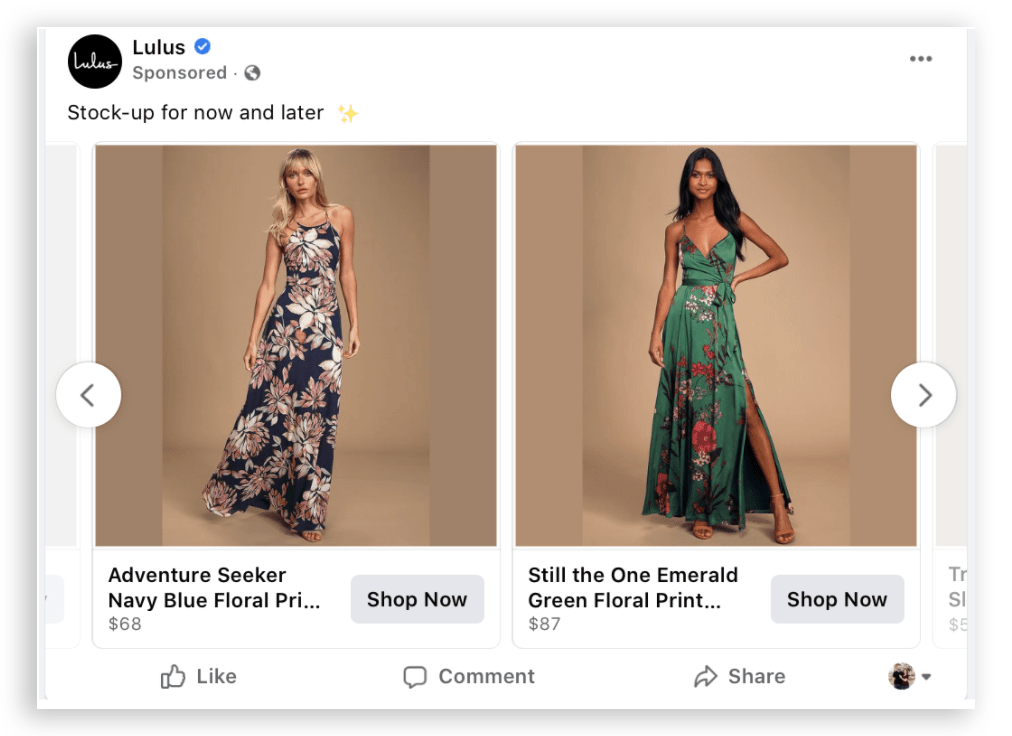
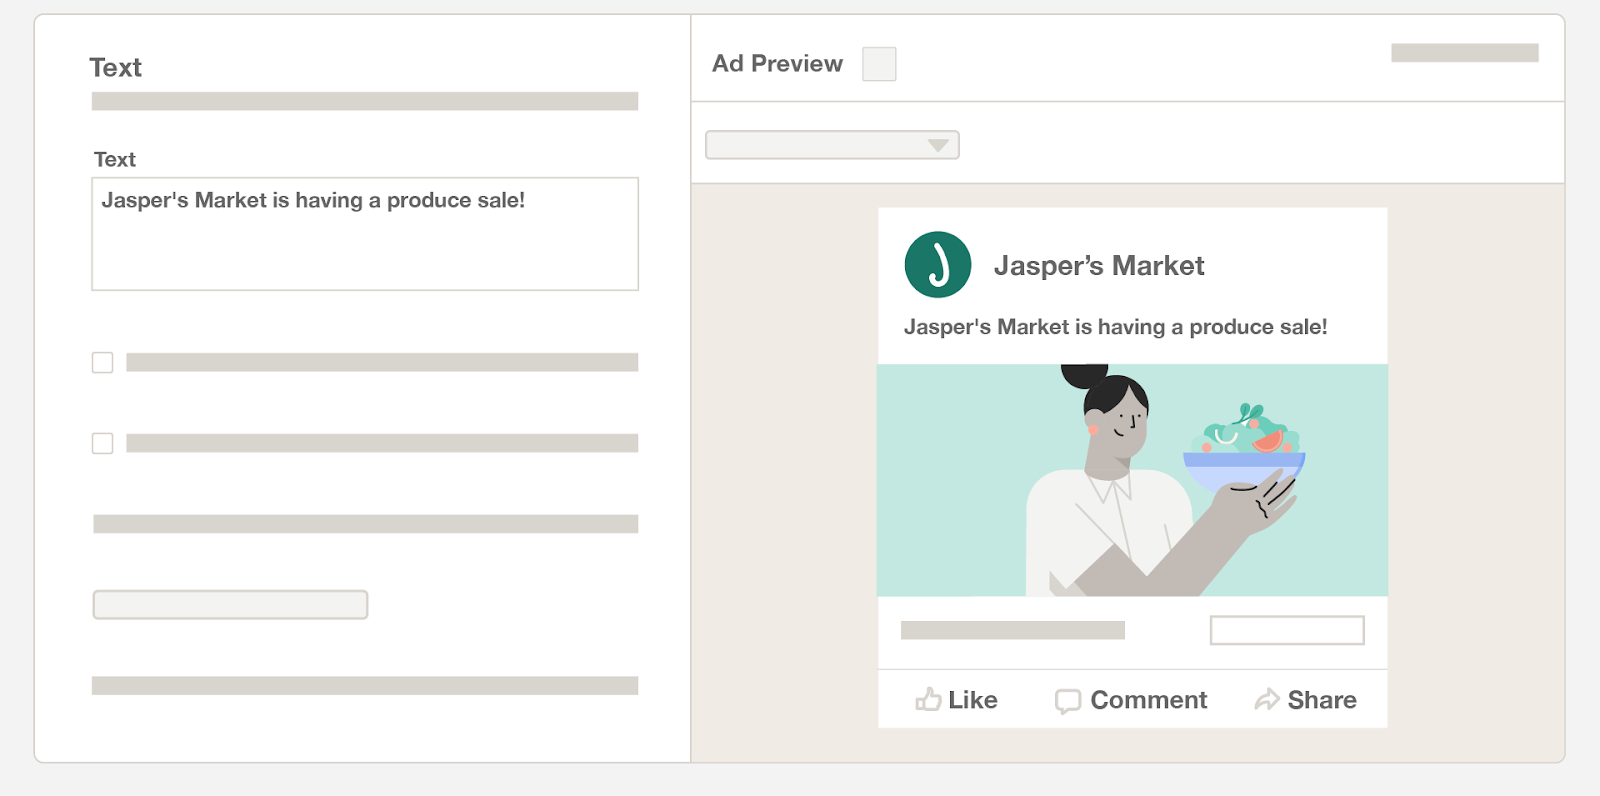
✔️Select your Facebook ad creative.

✔️Set your campaign budget.

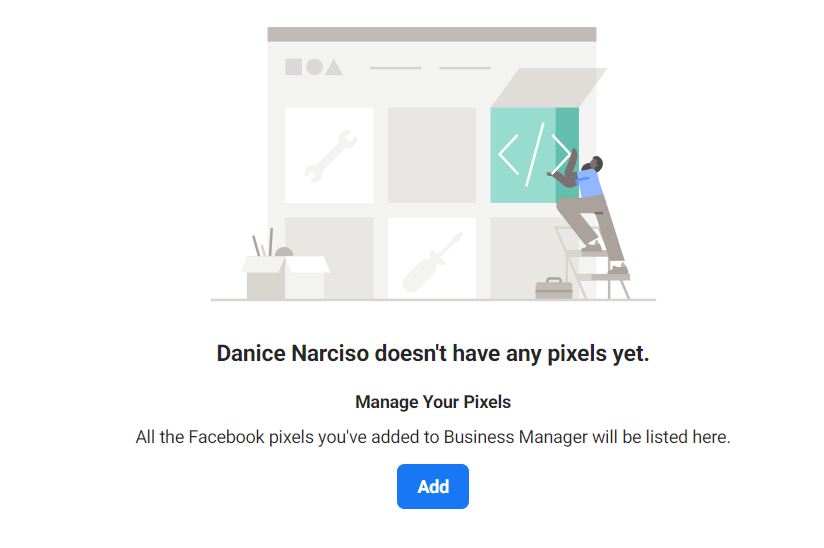
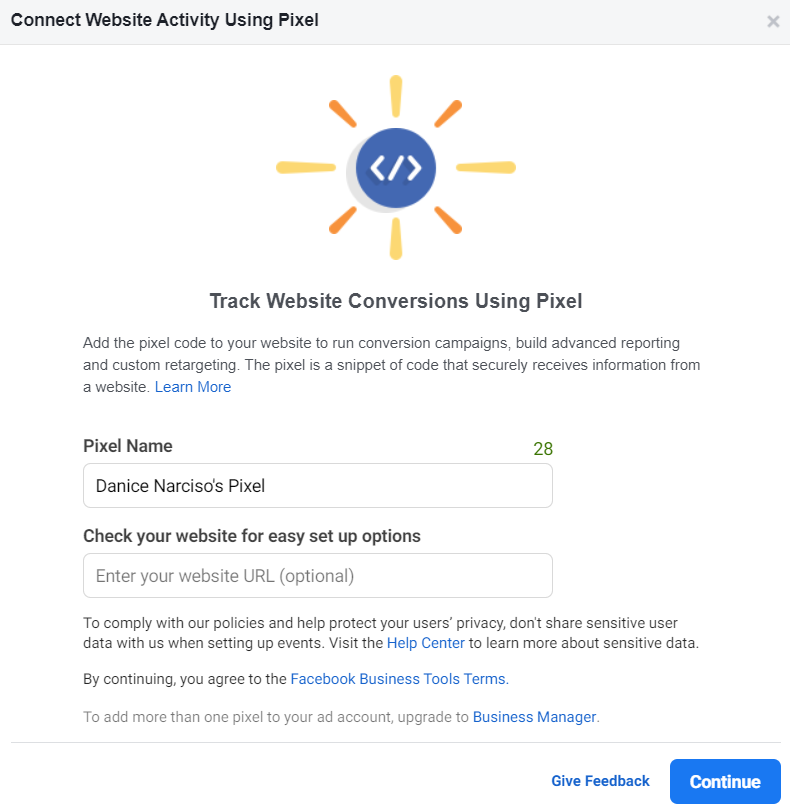
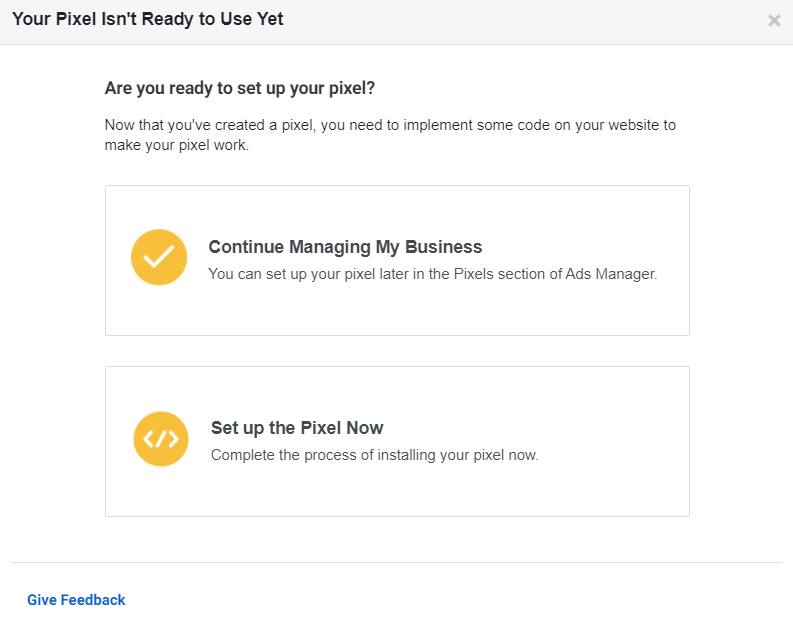
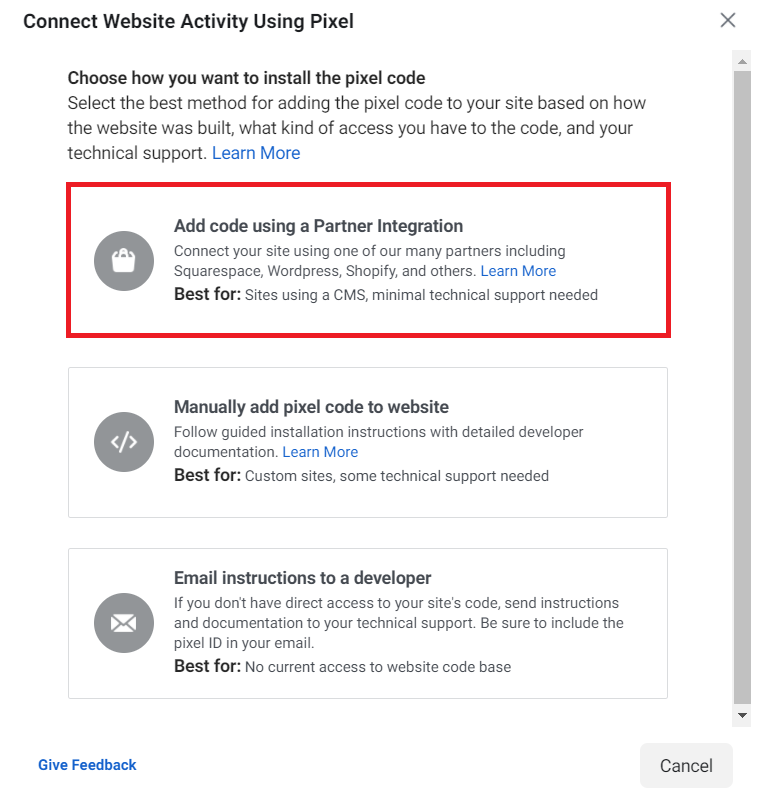
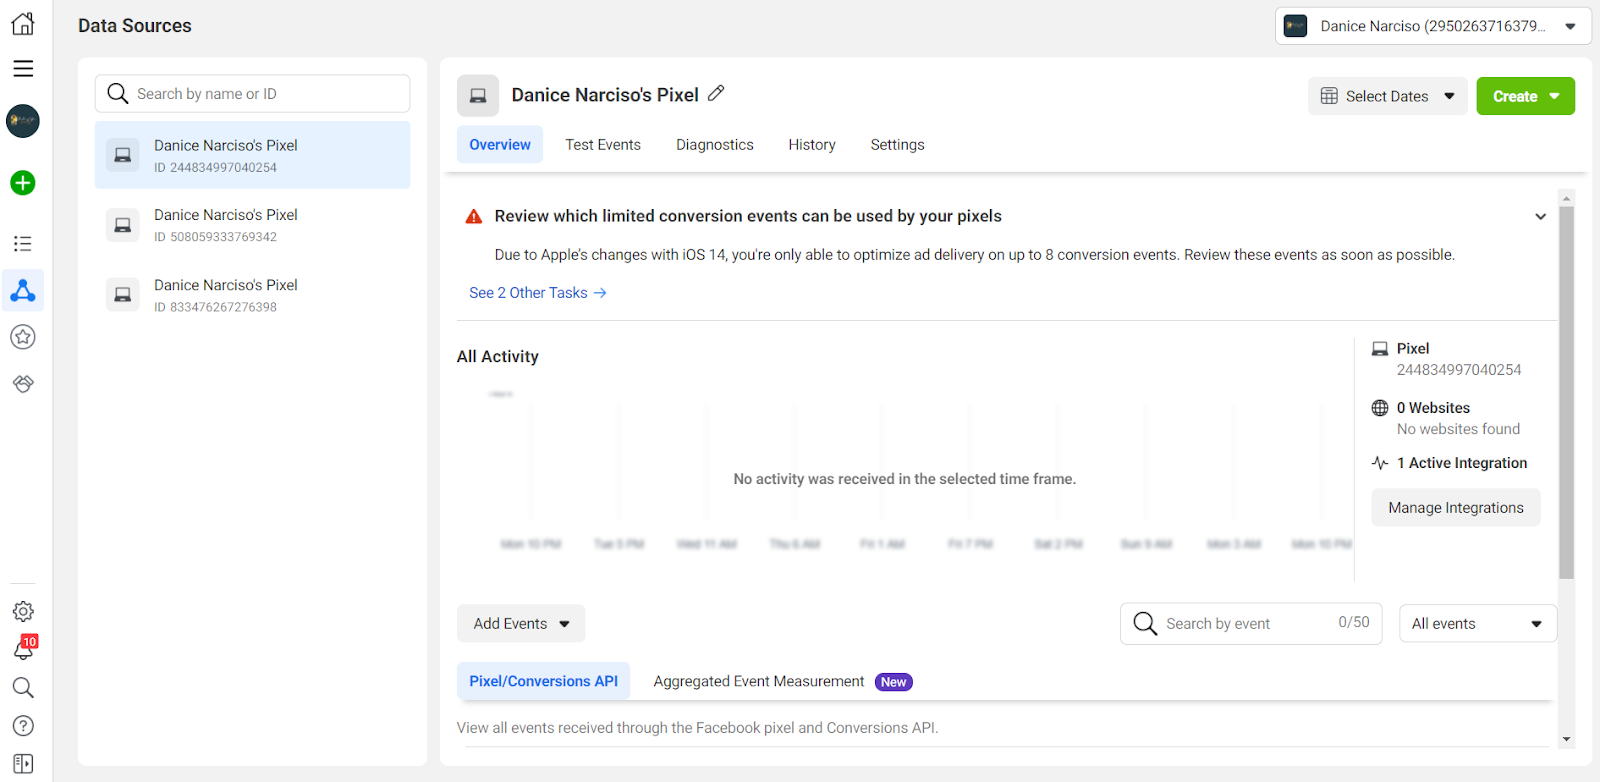
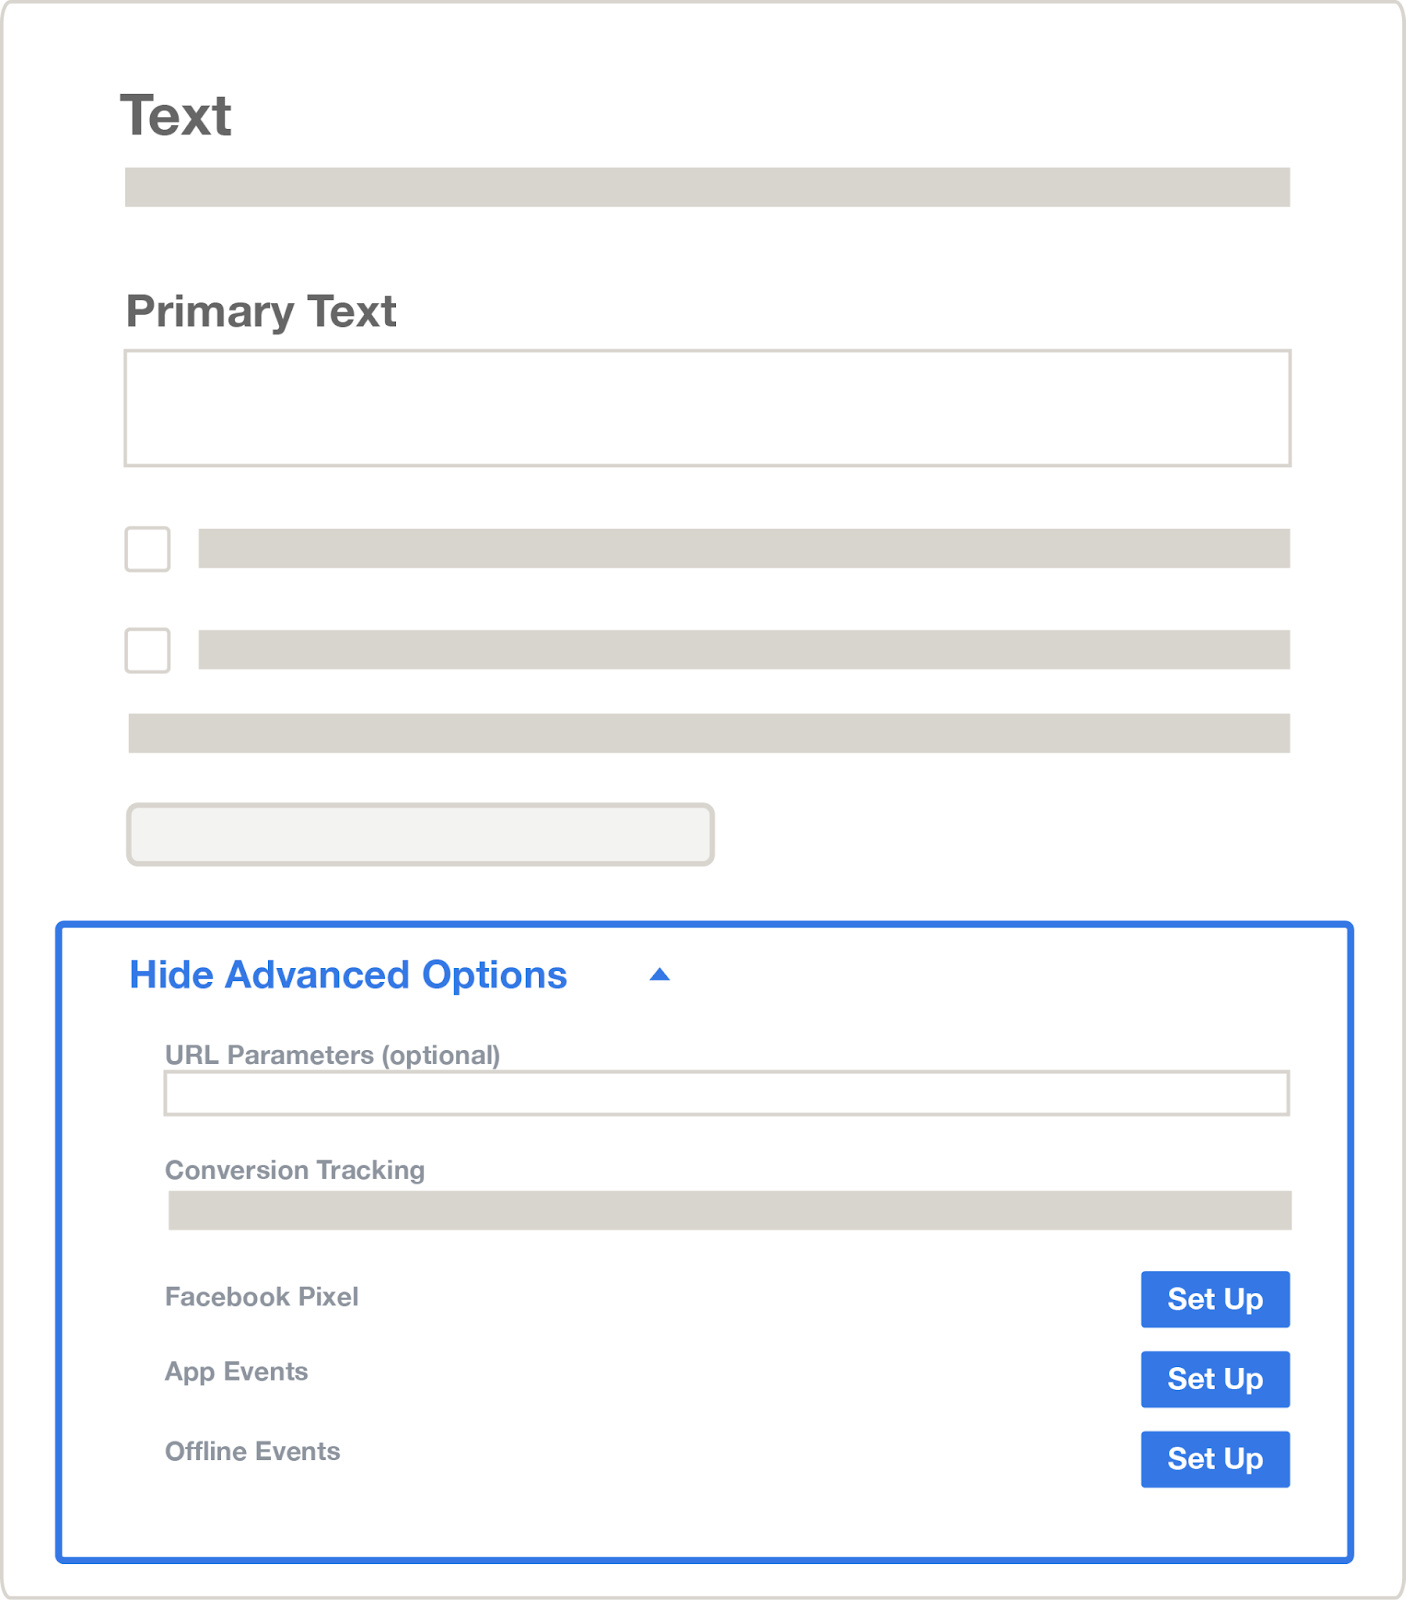
✔️Use Facebook Pixel to track and measure results.

✔️Check your campaign's performance and optimize it.

By the time we're done, you'll be able to set up, run, and even create an effective Facebook ad.

An effective Facebook ad that will expand your brand's exposure, target your audience, and keep sales flowing.

Sounds good, right?

Now let's begin...

Set Up Your Facebook Business Manager

People often struggle and give up on their Facebook marketing efforts.

This may be because of an incorrect account setup.

In the end, they don't get to launch a campaign at all!

But that won’t happen to you.

To start on the right foot, make sure that you correctly set up your Business Manager.

Setting it up is simple. Let me show you how!

The first thing you need to do is create a Business Manager account, go to business.facebook.com.

Set Up Your Facebook Business Manager

Then, click the Create Account button found in the upper right-hand corner.

When creating your business manager account, make sure you're logged in to your Facebook profile. Then please do so.

In case you don't have an account yet, create one first.

Then, enter your business name and your name, as well as the email address you wish to use for Facebook Manager, and click Next.

Create Your Business Manager Account

Next, provide your business details, such as your address, phone number, and website. Then click Submit.

Add Your Business Details

You will receive a confirmation email, click Confirm Now.

Next, we'll add your Facebook business page to your account. 

(If you don't already have one, let’s create one for your business. That's next on the list. Don't worry.)

To add it, click Settings on your business manager, then More Settings

Click Settings on your Business Manager

Select Accounts, then Pages, and click Add Page.

Set Up Your Facebook Business Manager

A pop-up window will appear, enter your Facebook Page name or URL. Then click Add Page.

A pop-up window will appear, enter your Facebook Page name or URL. Then click Add Page.

We’ve now added your Facebook business page.

Next, let’s create your ad account for your Facebook Business Manager.

You can do it this way:

If you don’t have an ad account yet, go to your Business Settings menu, select Accounts, then Ad Accounts

If you don’t have an ad account yet, go to your Business Settings menu, select Accounts, then Ad Accounts. 

On the blue Add drop-down menu, click Create a New Ad Account.

On the blue Add drop-down menu, click Create a New Ad Account.

Next, enter your account details and click Next.

Create a New Ad Account

Show that you’re using this ad account for your own business. Select my business, then click Create.

Who Will This Ad Account Be Used For

And that’s how you create an ad account. 

Job well done! 

But, if you have an existing ad account here’s how you add it to your Facebook Business Manager.

From your Business Manager dashboard, select Accounts, then Ad Accounts

And on the blue Add drop-down menu, click Add an Ad Account, then enter your ad account ID.

Add an Ad Account

Or click Request Access to an Ad Account, then type your ad account id, and click Confirm

Request to Access to Ad Account

When you're done, your home screen will look like this:

When you're done, your home screen will look like this:

Now, your Business Manager is all set up.

Bravo!

From now on, this will be your Facebook marketing and advertising hub.

Here, you can manage all aspects of your business.

Let’s pause for a moment and explain everything that’s going on. (We’ll start running ads soon, I promise!)

As we’re talking about the Facebook business manager, you probably want to know more about it and how it will benefit your business.

Don’t worry, I’ll give you more details.

So, what is Facebook Business Manager?

It's a central hub for both your business and Facebook marketing activities.

It’s where Facebook houses your business pages, ads account, and other tools you need in running your ads.

You can use it to create ads, manage Instagram and Facebook profiles, and share access to these assets easily among your team and external partners.

Let me tell you how it can help to grow your ecommerce business.

First, it gives you full control over your business.

With Business Manager, you can control, add user access and assign permissions to everyone.

Facebook Business Manager also lets you collaborate with your colleagues privately.

This means connecting to or giving colleagues access to your Facebook account isn't necessary.

You just have to ask for their Facebook Profile links and add them to the Business Manager (so they can access the Page without having to ask for your personal account deets.) 

Also, this tool can easily identify risks and suggest what actions to take to improve security.

What I like about this tool is that you can add and manage many assets by batch.

It's also possible to track performance across many ad accounts and pages.

I won’t go deep about each of these features. 

That's a story for another day. 

For now, let’s just focus on creating your first campaign.

So let’s move on to the next step…

Install Facebook Pixel On Your Shopify Store

Want to check how effective your ads are?

I want you to meet Facebook Pixel!

Facebook Pixel is the so-called "invisible sales agent".

It shows you what we want and how to get it!

I'll give you an example...

YouTuber Alexandra Gater recently posted a very cute bathmat on her Instagram Stories.

I swiped up to see the bathmat and added it to my cart. Then, I got distracted, and put my phone down.

By the time I opened Facebook, this ad appeared in my newsfeed:

Install Facebook Pixel On Your Shopify Store

Then, I headed over to my Instagram and saw this ad:

Retargeting

That’s what we call retargeting!

It’s a great way for us to remind buyers to return to the websites where they left their shopping carts and get those items they left behind.

Besides remarketing, Facebook pixels have other functions. 

It plays a role in tracking, analytics, and overall ad optimization.

By using this, you can ensure you're advertising to the right people.

Pixel also identifies different activities people take on your website, such as making a purchase or adding items to their shopping cart. 

By seeing how people react to your ads, you’ll know how effective they are.

So, how the heck do you connect it with Shopify?

Well, I got you!

You just need to follow these steps.

Go to your Business Manager account, click Settings, and then More Business Settings.

Go to your Business Manager account

Go to Data Sources, select Pixels, then the blue Add drop-down button.

Go to Data Sources

Click blue Add drop-down button

A new window will appear asking you to Connect Website Activity Using Pixel

Enter your pixel name and your website’s URL (optional), then select Continue.

Connect Website Activity Using Pixel

After that, click Set Up Pixel Now and choose how you want to install the pixel code.

Set Up Pixel Now

Select Add code using a Partner Integration. Click the platform you're using.

Connect Website Activity Using Pixel

Last, copy your pixel ID. Then, on your Shopify store, go to the Online Store and paste it on the Facebook pixel ID field.

Copy Your Pixel ID

Within a few hours after adding your pixel ID to your Shopify store, you’ll be able to see your website’s activity on your Business Manager.

See your website’s activity on your Business Manager.

Quick and easy, right?

Under pixels, you’ll see stats such as visitors, add to carts, purchases.

Knowing these stats will help you make better decisions for your e-commerce store.

Especially when you run your ads but before we jump into that.

Here's what's next.

Set Up Your First Ad Sets

This is the moment you've been waiting for!

It's time to look at ad sets.

I've put together a tutorial that explains how to do it.

✔️Name your ad set.

Name your ad set

✔️Pick the Facebook page you'd like to promote.

Pick the Facebook page you'd like to promote

✔️Create or choose your audience.

Within ad sets, you can select or refine the prospecting or retargeting list you made.

Don't forget to pick an age, language, location, and gender.

This will help narrow down your audience.

Create or choose your audience

We can further refine targeting using Facebook's interests, behaviors, or demographic information.

It's on the lower part of the page. 

Also, you can combine existing audiences into a new audience by layering these categories.

Or stick to your Lookalike or Custom Audience.

At this ad set level, you can also target people based on their connections.

It identifies people who like your app, business pages, or events, as well as their friends.

Connecting with people can help you target your ad to the right audience.

Connect with People

Here’s the next step.

✔️Select your ad placements: Manual or Automatic

As we all know, Facebook owns other famous apps.

Take advantage of this opportunity!

Make sure your ads appear on Facebook, Audience Network, Instagram, and Messenger.

Select your ad placements: Manual or Automatic

You can set up placement in two ways: 

  • Select it manually
  • Turn on automatic placements

Yet, Facebook recommends choosing automated placements.

You’re probably wondering why.

The answer is simple, follow the crowd and be visible everywhere!

With this functionality, Facebook can use various placements to achieve the best results for your campaign.

I’ll continue with the next part.

✔️Optimize the delivery of your ads.

Optimize the delivery of your ads

✔️Set a cost control.

Set a cost control

✔️Make a schedule for how long you want your ads to run in an ad set.

Run them continuously or just for a fixed period.

Make a schedule for how long you want your ads to run in an ad set

✔️Set ad set spend limits.

Set ad set spend limits

Choose either a daily or lifetime budget, whatever you prefer.

Several factors also play a role:

  • How much money you’ve set for marketing: Spend what you can afford.
  • Your product cost: Items with higher costs need higher ad spend.
  • The goal you are optimizing: For example, sales-focused objectives such as purchases cost higher.
  • Your average customer acquisition cost

Don’t forget to set a budget that meets your marketing goals.

The next step is...

✔️Choose when you get charged.

Choose when you get charged

✔️Choose the hours and days of the week when your ads will run.

Choose the hours and days of the week when your ads will run

✔️Choose delivery type.

Choose delivery type

Ad delivery options include standard and accelerated.

Here's a breakdown so you know what to choose.

  • Standard delivery - Displays your ads in a scheduled fashion.
  • Accelerated delivery - Displays your ads quickly. 

Now that you've created an ad set, let's look at the ad level.

Create Your Ad

We're down to the wire now.

Let’s create your ad!

Ads are media you produce to reach your audience. 

As part of the Facebook ad creation process, you'll pick the creative media (images or videos), text, links, and call-to-action buttons.

Below are the choices you need to make when setting up an ad:

✔️Name your ad.

Name Your Ad

✔️Choose your identity.

Choose Your Identity

Choose the Facebook page or Instagram account that will display your ads.

By doing so, you can increase brand awareness and social media presence, even if it is not your campaign objective.

Here’s the next step.

✔️Select your ad format.

Making a successful and effective first campaign can be tricky.

That’s why ad formats are so important.

It has different types, let me explain each one.

Single Image or Video Ads

We usually see these ads on our news feed.

Such Facebook ads are useful for advertising a particular product.

Images

  • Single Images

Marketing your brand through images is quick and easy.

That's why it's the most successful ad format. 

Single image ads work best especially if you’re on a low budget.

Or whenever you want an ad made right away.

So, how do you create one?

From your Facebook business page, you can create boosted posts that include an image ad.

You can also create one using Facebook Ads Manager.

  • Videos

Boost your brand's visibility.

Attract your viewers' attention.

Video ads make all of this possible.

Use Facebook Ads Manager to create your video ads.

Or boost an existing ad with a video.

Now that you know how to create a video ad.

Probably one of your questions is, “How long should my video ad be?”

I recommend keeping videos for 15 seconds or less.

By doing so, you’ll be able to keep your audience engaged.

One more thing.

Always end your ad with a clear Call to Action (CTA).

Carousel

Planning to add more images?

Add as many videos as you like?

Carousel ads might be an excellent choice.

With carousel ads, you can display up to ten images or videos in one ad.

Each image or video has a link, title, and description. 

Scrolling through videos and images is easy.

Just swipe right or left!

Below are some suggestions for how to use it.

Promote a variety of products and direct visitors to a variety of landing pages.

You can also showcase a product from various angles.

Or if you would like to describe a process.

This can also offer training and tutorials.

The last option is to present a large image in multiple frames to provide a more immersive experience.

Carousel

Collection

Interested in showcasing your products?

Let me show you the perfect ad format - try using collection ads!

A collection ad offers a full-screen view where you can upload a cover image or video.

Then your products are displayed below, which allows people to view and order them with ease.

Offering your visitors an enjoyable experience.

As well as converting interest into sales.

That's just amazing, right?

Collection

Dynamic Product Ads

Say you're browsing a store online and you're retargeted with the same product.

That’s a dynamic product ad!

It matches your Facebook pixel data with your Facebook product catalog.

Your website visitors will then see the products they viewed.

Or what they added to their shopping cart.

Amazing, isn't it?

Here’s how you create a dynamic product ad:

Dynamic Product Ads

In case you haven't already set up your Facebook product catalog, how do you go about doing so?

Use your Facebook Business Manager account to create a Facebook product catalog for your business.

It’s under the Assets menu.

You then create a catalog using Facebook Pixel.

If you're using Shopify theme, add the Facebook sales channel.

Now, you can sync products to your Facebook ad account.

After creating your catalog, you can create your dynamic product ads.

Go to your Ad Manager, click Create a new campaign, and set the objective to Product Catalog Sales.

Campaign Objective

With this update, you can select your product catalog from the ads set level.

Also, you can choose who sees the relevant products.

Dynamic product ads can also get new prospects.

Facebook does this by showing products that might apply to your new prospects.

✔️Select image(s) or video.

Select image(s) or video

✔️Create your text.

Create your text

✔️Explore advanced ad choices.

Explore advanced ad choices

Now, you’ve created your first ad on Facebook.

You should be proud of yourself.

Yet, it doesn't stop there.

Create Your Facebook Business Page

Note: Before you proceed, make sure you’ve already signed in with your personal Facebook account… or the account you’ll use to manage the Business Page

First Step: Sign Up

To create your Facebook page, go to facebook.com/pages/create.

Then, choose the type of page you want to create.

If you’re creating a page for your business or brand, select Business or Brand. Under that choice, click Get Started.

Create Your Facebook Page

You will then have to fill out your business details.

First, name your page after your business or brand. 

Choose a name that people will remember when searching for your brand.

Let's say, for example, Adidas is a brand name used by Adidas Group AG.

As for your page's category, enter a term that best describes your business.

As an example, let’s look at Nike.

When you think of Nike, you think of a sportswear store, right? It was a good move for their brand. 

If you want the same effect, select a category that customers will remember.

After you select a category, you'll see a box asking for more information, such as your telephone number and address. 

By providing this information, customers will know how to reach you.

Reminder: Make sure you read Facebook’s Pages, Groups, and Event Policies before clicking continue.

Once you've selected a category, click Continue

We've now created your business page.

Now, to personalize it a bit, let's move on...

Second Step: Add Images

You want your Facebook page to stand out, right?

So, now's the right time to consider how your Facebook business page looks like.

Let's add some images to your page.

Make sure you use images that represent your brand.

Choose wisely!

As you create your Page, you’ll need to choose an image to be your profile picture.

Choose a good one since people will see it every time they view your page.

I recommend using your business/brand logo.

Because the simplest representation of your business is the best, and it makes your brand memorable.

Think about Amazon, for example. 

Amazon conveys its friendly, trustworthy nature by using its smiling logo:

Amazon

Another example would be eBay.

Through their fun and colorful logo, they let customers know they will have an enjoyable shopping experience, and that their site is friendly and easy to use.

eBay

Also, don't forget to use a square image, not a rectangle, otherwise, it will look silly.

Make sure your profile picture is the right size.

Note: Facebook profile photo displays are 170 x 170 for desktop and 128 x 128 for mobile.

Once you’ve selected your profile image, click Upload Profile Picture.

Now let’s upload your cover photo.

Cover photos are banner-like images at the top of your page.

Use it to represent your brand's essence and personality.

Nike is a good example to give you an idea.

Nike

I like how they used their famous tagline in their cover photo: Just do it.

It's something you can associate with their brand right away.

Note: If you’re using a cover photo with text, make sure it's not too close to the edge. Otherwise, it might get cut off. 

Here’s another example:

Levi's

“Buy better. Wear longer,” says clothing brand Levi’s cover photo. 

This is an example of how a call to action can help your brand.

At first glance, it already answers the question, “What’s in it for me?”

As soon as you upload your cover photo, check your page. 

Make sure it’s properly uploaded (or else you’ll end up with a blank cover!)

Because pages without cover photos have a smaller chance of getting likes.

Keep in mind what size your cover photo should be.

Note: Facebook profile photo displays are 820 x 312 pixels for desktop and 640 x 360 pixels for mobile. The image must be 400 pixels wide and 150 pixels tall, but the suggested size is 720 x 315 pixels.

After choosing an appropriate photo, click Upload a Cover Photo.

Upload Your Cover Photo

Voila! 

The skeleton of your Facebook business page is in place.

Here's the next step.

Third Step: Create Your Username

Another important step in setting up your Facebook business page is to create your username.

By creating your username, you can let others know where they can find you on Facebook.

You can create a username of up to 50 characters.

Make yours short, simple, and memorable.

Create Page Username

After deciding on your username, click Create Page Username, type it in, and then click Create Username

Then you’ll see a pop-up box that displays Facebook and Messenger links for users to connect with you online.

You've Create Your Username

You’ve now created your business page username.

Now onto the next step.

Fourth Step: Add Your Business Details

While you may wish to add the details later, enter your business details in the About section of your page right away.

By doing so, customers will know how to contact you, etc.

To add these details, click Edit Page info on the top menu.

Here you can share all the details about your e-commerce business, such as...

  • Description - Tell us a little about your company.
  • Category - Set your product's category.
  • Contact - Make sure you list your contact so they can reach out directly to you.
  • Location - Make sure they know where you're located and which regions you serve.
  • Hours of operation - Let your clients know what hours you are open.
  • Extra options: Impressum, price range, and privacy policy link.

Don’t forget to click Save Changes under each section!

… and now...

Fifth Step: Share Your Story

Now that your potential customer knows more about your business.

Don't forget to give them reasons to stay!

Tell them what your business is about, what you can offer, and why they should Like and Follow your page.

For your story, you can also add a headline, text, and an image.

Here's how you can create one for your page:

On the left, click See More, then About, and then choose Our Story on the right.

When you’re done, click Publish.

Share Your Story

Now that you’ve shared your story.

It’s time to...

Sixth Step: Make Your First Post

You're almost done, you’ll publish your page soon.

But first, you need to write your first post.

By writing your first post, you’ll be able to provide your visitors with valuable content before you ask people to like your page.

You’re probably wondering...

What should I write about in my first post?

Posts can be your own or you can share relevant content from other industry leaders.

What you post is completely up to you!

Make Your First Post

Besides that, you can also create specific posts, like an offer or an event.

Here’s how you create your first post.

Click one choice in the Create box found on top of your page.

Create Post

Your visitors will appreciate it if you post something valuable to them.

Think of it this way, for instance.

Your first post can be a special offer or token given to your first 100 followers.

They'll certainly notice that!

Giving them freebies will make them happy.

It will also encourage them to share your page with their friends and family.

We’re almost done, now let's...

Last Step: Publish Your Page and Invite People

Your page is now ready to go live.

To publish your FB business page, just click the green Publish Page button found on the left-hand side of the menu.

Publish Your Page and Invite People

There you have it!

Your page is now live and visible to everyone.

Now, it's time to get some people to follow you.

You can start by asking your Facebook friends to like your page.

Use Twitter and other social media sites to promote your page.

Don’t forget to add CTA’s (e.g. follow us) on your promotional materials. 

Adding CTAs will help customers know what to do next.

Sounds good, right?

Okay, now we’ve created your Facebook business page.

It's time to move forward.

Create Facebook Audiences

A successful Facebook ad requires you to show the right message in front of the right audience. 

This is where Facebook’s absolutely massive data about its users will help you take your offer…

... and place it in front of people who care enough to buy it!

Now, I’ll share with you ways to create different Facebook audiences.

You’ll learn what retargeting audiences, custom audiences, and similar audiences are.

Last, we’ll identify the best targeting options you can use for your current situation

Let’s get started.

Facebook Audiences

You can create and manage your target audiences with Facebook’s Audience Manager.

Exactly how do you use this feature?

From your Business Manager, go to More Tools, then select Audiences.

More Tools

On your Audiences page, you can create new audiences and see all your saved ones. 

With Facebook Audiences, you can reach your target audiences.

Audiences

Let's now find out which type of audience you want to target, and how to reach them.

On Facebook, you can create saved audiences, custom audiences, and lookalike audiences.

With these audience types, you can create the right target audience for your ads.

So let's start with...

Facebook Saved Audiences

So, what’s a Saved Audience?

It's an audience you can control by selecting people's interests, age, gender, location, etc. 

Surely, you're wondering, how do I create one?

Go to the Audiences section of your Ads Manager.

Audiences

Next, select Create Audience on the right-hand side, then click Saved Audience.

Create Audience

Now, you can create, name, and save it.

Create A Saved Audience

Wait, there's more.

Did you know that there are different ways to create a saved audience?

We can create saved audiences in a variety of ways.

First up is...

✔️Location-based targeting

Planning to target people in specific locations?

Using Facebook, you can target people by country, state, county, designated markets, city, and postal codes.

Now, let me show you how to set it up.

It’s simple - enter the regions you want to target.

Location-based targeting

You can also filter it by:

  • Everyone in this location
  • People who live in this location
  • People recently in this location
  • People traveling to this location

Next on the list is...

✔️Demographic-based targeting

On Facebook, you can customize your audience based on demographics.

This means you can target audiences by age range, gender, or language.

Demographic-based targeting

But that's not where it ends...

You can also target people by their life events, job titles, ethnicity, political views, and so much more.

Detailed Targeting

Next, we’ll move on to...

✔️Interest-based targeting

Facebook lets you find people according to their interests, which is a good way to reach the right audience.

By knowing their interests, you’ll find out if they’ll show interest in your brand or product.

Say, for example, you're selling sportswear.

You can target people who like products related to your business.

Or you can try targeting your competitor’s followers.

You can also target people who read blogs and articles related to your market segment.

Here's how you can do it.

Browse the menu or type one interest.

You’ll also see related topics and interests.

Interest-based targeting

Facebook generates these interests based on the pages liked and apps used by its users.

Now, let’s move on to...

✔️Behavior-based targeting

Interested in targeting people with events they like or items they buy?

Try behavioral targeting.

Here's a sample of how this works...

Say, for instance, you sell K-pop merchandise...

To engage people, you can reach out to those who follow relevant pages or those who buy merchandise already.

Behavior-based targeting

With Saved Audiences, you can now create ads for certain groups of people.

Now let's talk about the next audience type.

Facebook Custom Audiences

Custom Audiences are probably your highest-value target audience.

You’re probably wondering why...

This is because they allow you to retarget past visitors to your website.

And that's not all...

You can retarget people who have engaged with your content, page, or app.

Like Saved Audiences, you can also make Custom Audiences in various ways.

Let's look at each one.

Create a Custom Audience

✔️Create Custom Audiences from Customer Files

One way to create a custom audience is from customer files.

Customer files are a list of phone numbers, email addresses, and other contact details from existing customers. 

So, how the heck do you create a Custom Audience from customer files?

Here's what you need to do:

First, create a Facebook Custom Audience.

Facebook Custom Audience

When that’s done, go to Customer List, click Next.

Create Custom Audiences from Customer Files

Next, choose between updating an existing customer list.

updating an existing customer list

Or prepare your customer list whether you want to:

  • Import from MailChimp
  • Download File Template

How to Prepare Your Customer List

Then import your customer data to build a new Custom Audience.

Next, choose at least one main identifier, then click Next.

Prepare Your Customer List

Choose whether you want to add a column for customer value. Then select Next.

Select List Type 

Reminder: Don’t forget to tick the box below. This means you agree with the Facebook Business Tools Terms.

After that, add your Customer List by uploading your file in CSV or TXT format.

Next, select the Customer Value Column, name the Customer Audience, and click Next.

Add Customer List

Next, you need to map your columns to identifiers to upload your list. Then click Import and Create.

Map Identifiers

Well done! 

We have successfully uploaded your Customer List.

Now let’s move on to the next...

✔️Create Custom Audiences Based on Web Traffic

You can create remarketing ads based on people who have already engaged with your website.

That's what we call a traffic-based audience.

It's a really valuable audience. Why?

Because the people who will see your advertisements…

... are the same people who have already expressed an interest in them!

They already went to your website.

This means something already caught their attention and interest.

Now your chances of convincing them to buy your products are even better.

(Ever heard of the saying “the fortune is in the follow-up?”. Well, that is kinda what we’re doing here.)

You just have to remind them what they liked about your product and how it can benefit them.

That’s the importance of creating audiences based on web traffic.

To do that, you will need Facebook Pixel.

(We’ve finished setting it up in a previous section so we’re all good.)

Now, let's create a Custom Audience.

Once you’ve installed Facebook Pixel, go to Audience, then click create a customized audience based on Website Traffic.

Choose a Custom Audience Source

Then the following options will appear:

  • All website visitors
  • People who visited specific web pages
  • Visitors by time spent

Create a Website Custom Audience

Just pick one, select Create Audience and you're done!

Up next, let’s learn how to...

✔️Create Custom Audiences Based on Engagement

Last but not least, there is an engagement-based audience.

Engagement-based audiences are those who have interacted with your Facebook Page.

Click on Create Custom Audience, then select Facebook Page as your source, then select Next.

Create Custom Audiences Based on Engagement

You can then target people based on:

  • People who liked your Facebook Page.
  • Everyone who engaged with your Page.
  • Anyone who visited your Page.
  • Those who reacted with your ads or posts.
  • People who clicked any call-to-action button.
  • Those who sent a message to your page.
  • Or people who saved your posts or Page.

Create a Facebook Page Custom Audience

Now, you can reach high-potential audiences.

Audiences that want to know more about your product or brand.

Our last audience type is up next.

Facebook Lookalike Audiences

Looking for new ways to target potential customers?

Facebook Lookalike Audiences can help you find your new best customers.

It’s a powerful tool for better Facebook ad targeting.

It uses your top customers' data to find new prospects likely to become good customers as well.

Facebook looks for users who "look like" your best customers (that's like finding gold!)

It's like you're making a replica of your best customers.

Now you’re probably wondering, how do you create one?

Go to More Tools > Audiences > Create Audience, then click Lookalike Audience from the creation menu.

Lookalike Audiences

You will then need to select your source and select the country or countries where you want to discover similar audiences. 

Give your desired audience size and once done, click Create Audience.

Create a Lookalike Audience

Here are a few reminders for you.

Create a Lookalike Audience using any of your Custom Audiences, size range, and likeness from 1% to 10% of your chosen country’s population.

A 1% Lookalike Audience are people who highly resemble your Custom Audience source.

Those are easy targets for you!

Okay, now you have a decent overview of Facebook audience types.

Let's discuss campaigns next.

Create a Facebook Ad Campaign

Have you noticed the ads that appear in your newsfeed?

Particularly those sponsored posts?

Did you know that these sponsored posts are part of a larger advertisement?

That's what you call a campaign!

A campaign is actually the first thing to do when you create your ads.

It's where you keep your ads.

Here's how the campaign structure looks.

Each campaign has an ad set. 

An ad set is where you find your audience, choose your targeting options, and set your budget, which includes the ads your users will see.

Let’s hold that thought for now. (We’ll discuss ad sets later.)

Let me show you how to create a campaign first.

Go to your Business Manager, click the Ads Manager.

Once you are redirected to the campaigns manager, click Create to get started.

An option to choose a campaign objective will appear.

Now, the question is...

How do you select the right campaign objective?

First things first, make sure you identify your campaign objective.

Choose the one that best fits your brand.

Because it will affect your campaign, how it’s optimized, how you pay for it, or select a type for different purposes.

There are three types of campaign objectives:

Optimize Your Facebook Ad Campaign

An effective Facebook campaign begins with the right setup.

The key to its success, however, is to monitor its performance and enhance it.

Especially if you wish to succeed on Facebook.

Check your Facebook ads at least once a day if you want to be successful on Facebook.

Once you increase your spending, it becomes more frequent.

The only problem is that you might try to change your targeting.

If you do not see any sales after a day, you can turn off your ads.

When you advertise on Facebook, you must be patient.

It may take some time for Facebook's advertising algorithm to optimize and learn who would be interested in what you are offering.

So, if you're not sure whether to turn off your ads.

I suggest you just wait.

Ensure it has at least 1,000 impressions before you invest more, shut it off, or test something else.

Here's how you can optimize your ads.

Create Funnel

Targeting prospects and retargeting are both important.

But didn't you know they work best together?

You just have to build a funnel.

You may ask yourself, “What is a funnel?”

It’s a marketing strategy based on the fact that most of the people you target are not yet ready to buy right away.

It also focuses on marketing to your audience's intent to buy.

So, how can you create a funnel?

To make a funnel, target a cold audience of potential customers.

It can be a behavior-based audience or a Lookalike audience in one campaign.

Apart from that...

You can also retarget your website visitors into another campaign.

Here are the steps to set it up.

On your Ads Manager, go to Analyze and Report, then select Analytics.

Then, click Activity from the menu, and select Funnels.

Analytics

Click Create Funnel. 

Create Funnel

Then select Add Funnel Step, and choose an event.

Add Funnel Step

Once you’re done adding a funnel step, you’ll have these options.

  • Select Refine near a step's name to add parameters. These parameters will allow you to add more rules to an event.
  • Or click a step's name to change the event.
  • The third one is to reorder a step. Hover over the step you'd want to reorder and click and drag to reorder a step.
  • Select at least one funnel step from those three. Click and select Save.
  • Enter a name and select Save to complete the process.

Now that you've saved your funnel, you can view the results and edit as needed.

There you have it! You've just optimized your ads!

Well done!

Your first-ever Facebook ad is now live.

But we're not done yet.

As a present, let me share even more tips on how to create a successful Facebook ad.

Tips and Tricks for Creating A Facebook Ad That Converts!

Creating a Facebook ad that converts can be tricky.

I'll make sure that doesn't happen to you.

Here are a few tips to create a high-converting ad:

Tip # 1 Browse the Facebook Ad Library

Don't know where to start?

Interested in knowing what your competitors are doing?

Here's how.

You can find a comprehensive list of Facebook ads currently running.

Facebook Ad Library gives you access to this.

So take advantage of it and search by name to find out what other brands are doing.

There, you can see how your competitors promote their products through their current ads.

That's pretty great, huh?

You can now use these details as inspiration for your ads.

Tip # 2 Be Genuine

Make sure you pay attention to your brand's voice when creating your ads.

Do you want it to be professional?

How about witty or funny?

You should take these things into account.

Be sure, however, that your ads must be genuine.

The more genuine your ads are, the more people will interact with them.

And more people will want to know your brand, product, or service.

Tip #3 Use Photos of People Using Your Product

It's quite common for us to see images or video ads in our News Feed.

This type of ad normally catches our attention.

I like ads that show people using the product.

As well as those that have eye-catching graphics.

You should definitely try it!

This will encourage people to check out your ad and click on what you're offering.

Tip #4 Concentrate on List Building

For first-time advertisers on Facebook, concentrate on list building.

Get prospects' email addresses by giving them freebies.

You can then nurture those leads using emails and Facebook ads. 

It's also a cost-effective way to sell your products!

Tip #5 Focus Most of Your Direct Sales on Retargeting

Aren't you frustrated when you watch a buyer get close to converting only to leave your website in the blink of an eye?

The only thing that would make them interested again is to get their attention and remind them why they were interested, to begin with.

Retargeting is one of the best ways to close sales that didn't take place!

On top of that, retargeting efforts are cost-effective.

Tip #6 Try Selling Through Webinars and Online Training

You can try selling through webinars and Online Training. You can help your customers gain new skills and at the same time introduce (or pitch) your products at the end This is what some marketers call “sell-ucation”

Tip #7 Try Selling Many Products at Once or In Bundles

You can increase the cost per sale this way. That means more bottom-line revenue for you!

Tip #8 Try Discount Codes for Retargeting

Catching the attention of your customers is easier when you offer discounts.

Discounts give customers value and they also become an advertising psychological trigger.

Tip #9 Retarget Previous Customers

Wouldn't it be great to build a business that lasts long?

For a long-term business to exist, your customers must remain loyal to your brand.

Apart from acquiring new customers, it’s equally important to retarget previous customers.

They’re your best audience since they already know how great your products are.

Tip # 10 Try Running Click-To-Messenger Ads

Did you know that your Facebook ad creates a conversation in Messenger on your business page if someone clicks it?

It's a way to connect with your potential buyers.

You can do this by placing your Facebook ads on Messenger.

Even better, you can create automated responses to your customer's questions.

You can easily address their inquiries and encourage them to buy.

Stay Motivated, Continue Learning, And Grow Your Network!

It’s no secret that Facebook is one of the best platforms out there.

Besides its billion users, it’s an easy-to-use advertising platform.

Facebook is the place to be!

This is especially true if you want to flood your new e-commerce store with customers.

In this Facebook Marketing guide, we taught you all you need to know.

Be sure to apply all the things you've learned.

The Facebook ads you run will be significant support for your e-commerce business.

You’re one step closer to your goal as it grows.

The hand of success waving at you!

Remind yourself to always...

✔️Stay motivated.

✔️Be patient.

✔️Soak up everything you can!

✔️Be a good listener.

✔️Don't be afraid to ask questions. 

✔️Listen to what others have to say.

Last but not least…

Don't miss out on any useful information you can get your hands on.

I hope you find this Facebook marketing guide useful as you advertise on Facebook.

And there you have it – you just learned how to buy traffic from Facebook Ads!

And if you start applying what you learned immediately, it

won’t be long before you can start to grow and scale your store.

However, before you start running Facebook ads, let me warn you:

Running Facebook Ads without optimizing your store is like filling up a leaky bucket with water.

No matter how you fill it, it doesn’t get full.

Now, if you want to start, grow or scale your store, you don't want that to happen, do you?

You don't want any store visitors and shoppers to fall off the cracks.

And to solve that, you have to optimize your store first.

This includes an optimized checkout page, product page, collection page and homepage.

Plus you’ll have to improve your site speed because most online shoppers don't want to wait.

Not only that but you'll have to buy a bunch of expensive Shopify apps to optimize different parts of your store.

Fortunately, there’s an easy way to do that.

Enter Debutify:

Debutify is an all-in-one Shopify theme for conversions.

With 50+ profit-pulling Add-Ons, you can now optimize your store in just a few clicks. And you can cut all those expensive Shopify apps.

Best part? You can try Debutify -- FREE for 14 Days.

Try Debutify today to have an optimized facebook-ads-ready store right now.

Optimize Your Store With Debutify - Today!

Diane Eunice Narciso
Author

Diane Eunice Narciso

Diane Eunice Narciso is a content marketer, strategist, and writer who's skilled and passionate about marketing, social media, eCommerce, etc. And is also an expert in sales and business development nurturing strategic partnerships and collaborations.

Share post